Agency Business & Consulting WordPress Theme
- Author: Pixelcurve
- Update: 01 January, 2025
If you have any questions, ideas or suggestions, please create ticket through our support channel Support Desk.
Installation
Follow the steps below to setup install WordPress Theme:
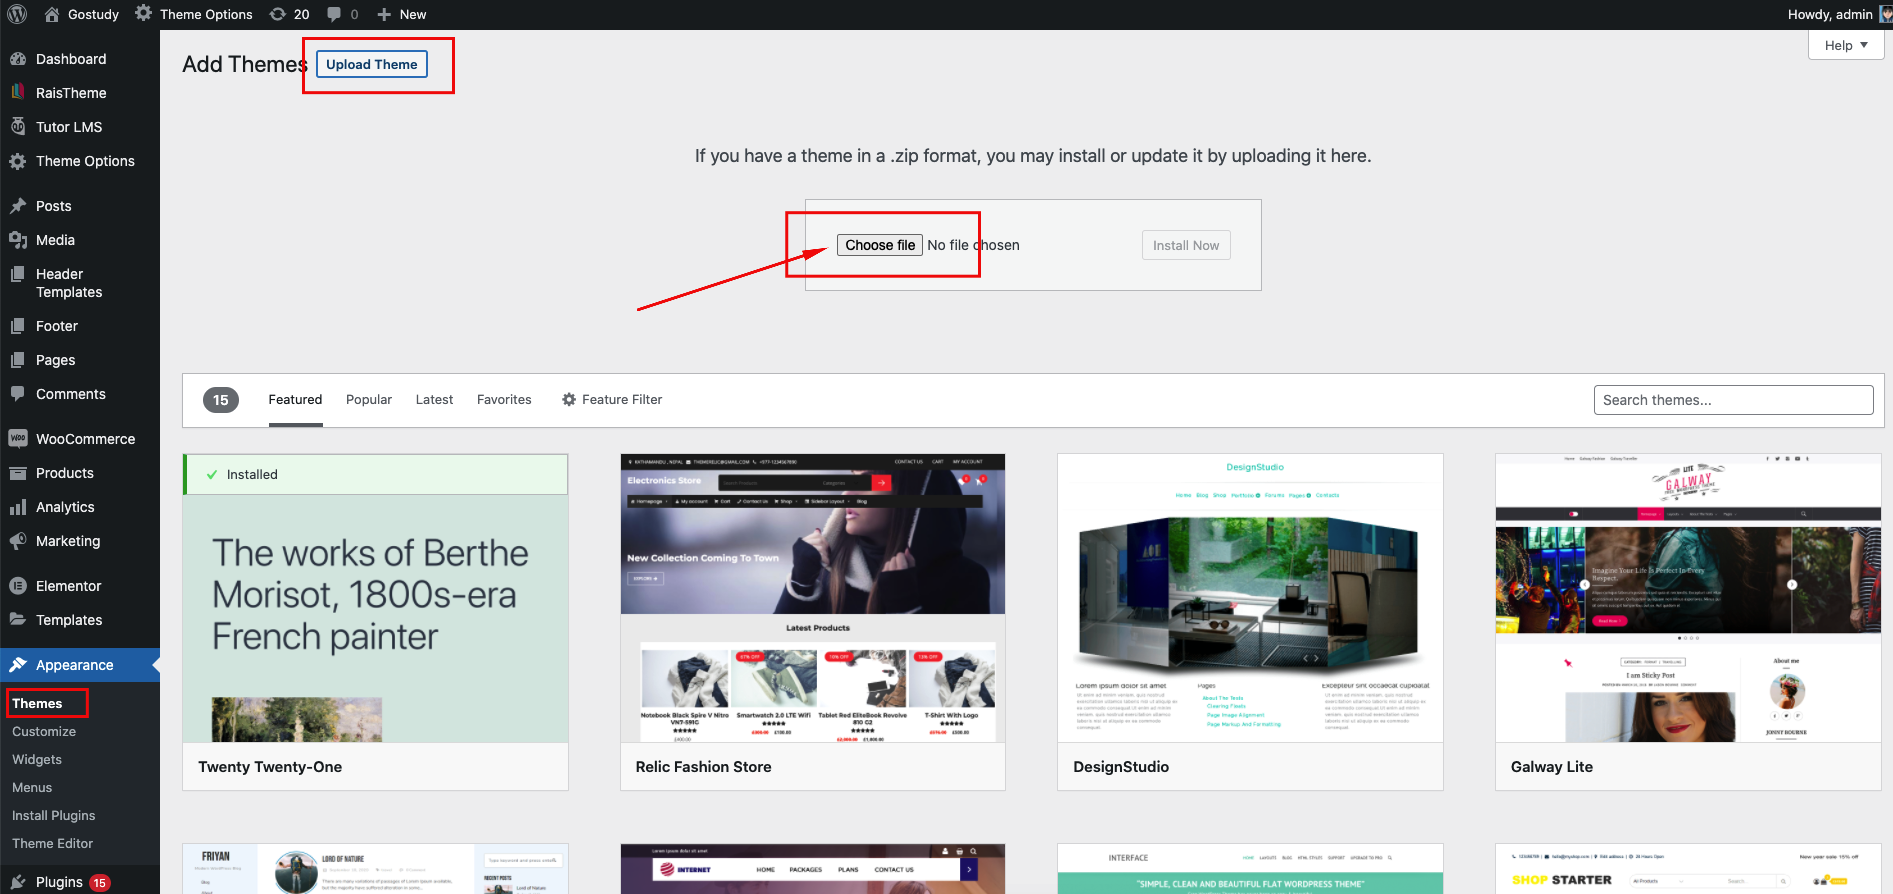
- Login to WordPress admin panel
- Go to: Appearance > Themes
- Click on the Add New button, then click on the Upload New
- Upload theme zip file
- Click on the Activate button
Video Tutorials
Visit the Pixelcurve youtube channel for tutorials video that will help you build your new site.

Run Setup Wizard
After activating the theme installation process will be started.
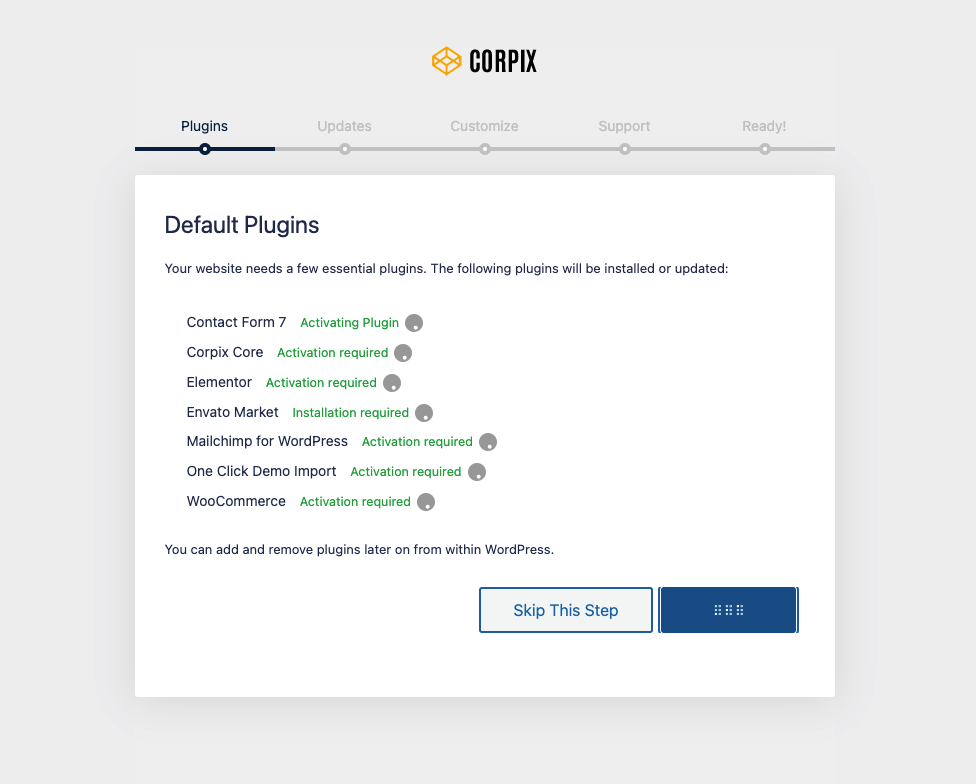
- Corpix Core - Required and must install plugin.
- Elementor Page Builder - Required Page builder plugin.
- WooCommerce - Optional. Install if you want commerce/store functionality.
- Envato Market - Recommended. This plugin helps you automatic updates to your Themes & Plugins purchased through Envato Market.
- Mailchimp for WordPress - Recommended. This plugin helps you to get subscribe mail
Theme Options
Like a theme options panel in our theme, we use redux framework. It is very easy to use.
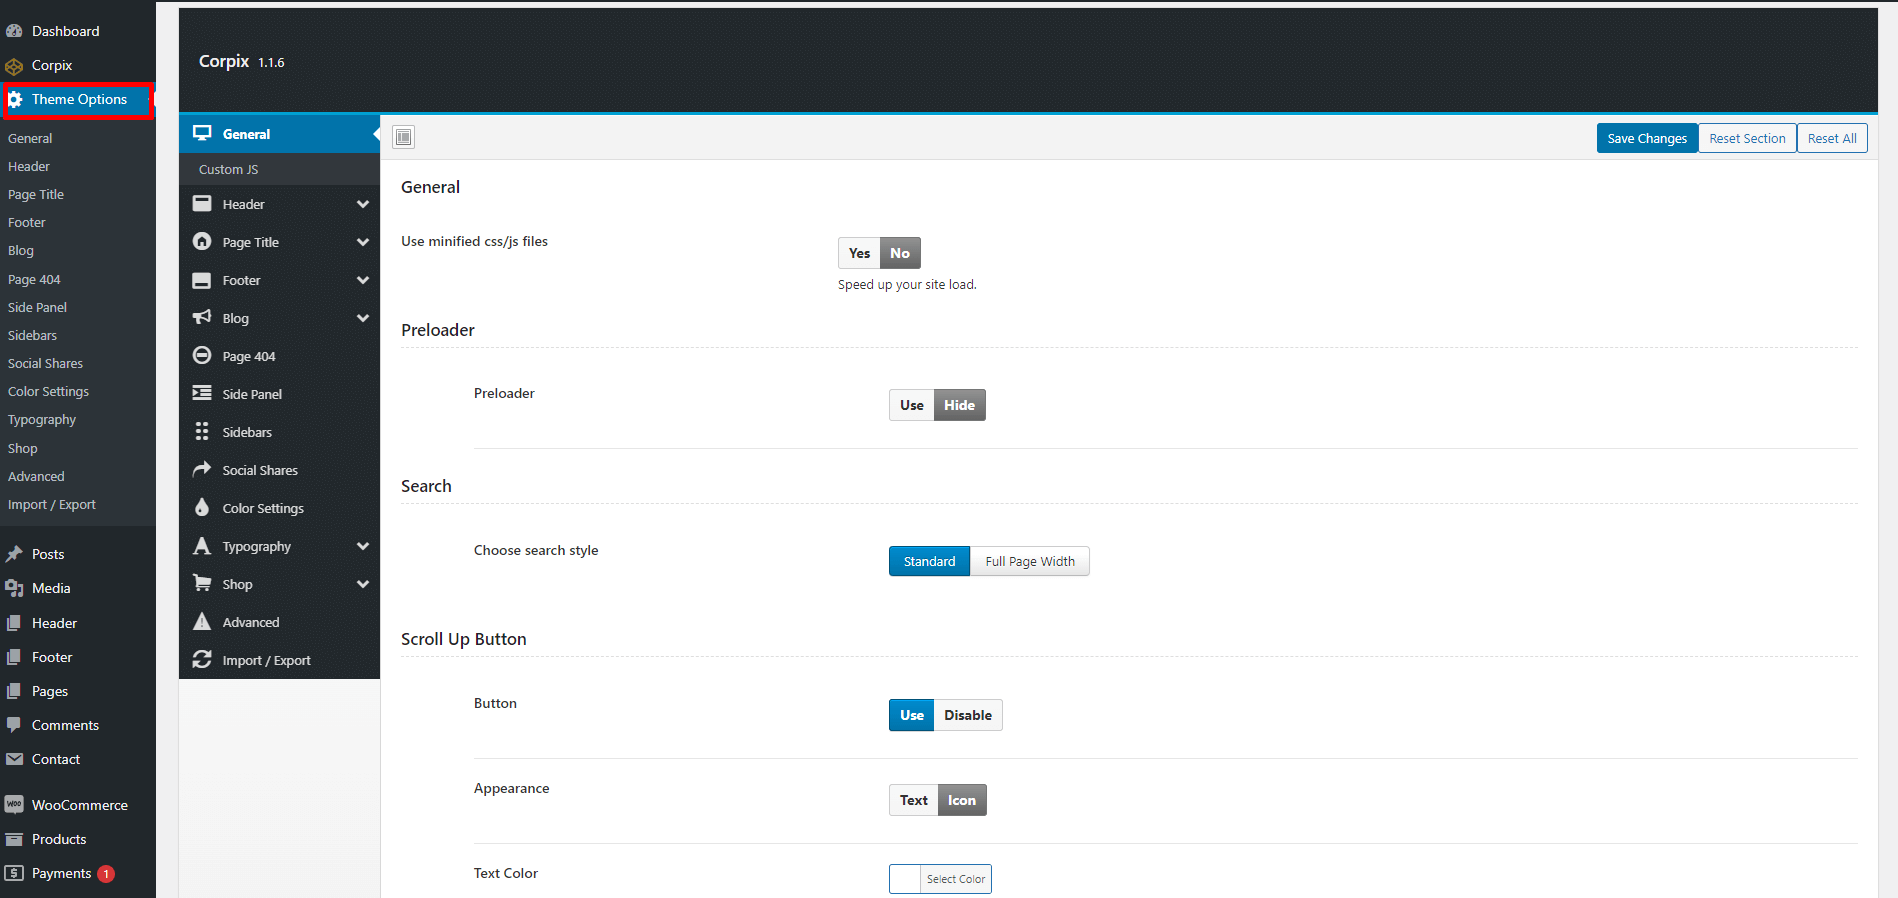
General
Minified CSS/JS
To load your site faster you can use this option.
Preloader
You can show or hide the preloader in the site.
Search
You can change the style of search bar pop up. There are two style. Standard & Full page width.
Scroll Up Button
You can enable of disable the scroll up button from here. You can also change the style from appearance section.
Layout
You can set the container width of a page. "Elementor Width" is Recommended!

Custom JS
If you wanted to write some custom JavaScript code you've to click the submenu option "Custom JS" under general tab.
Header Option
Header Builder
Using Header Builder you can build header. After selecting Custom Builder you can see the Header what was created by elementor. After that select the header. Follow the screenshots below.

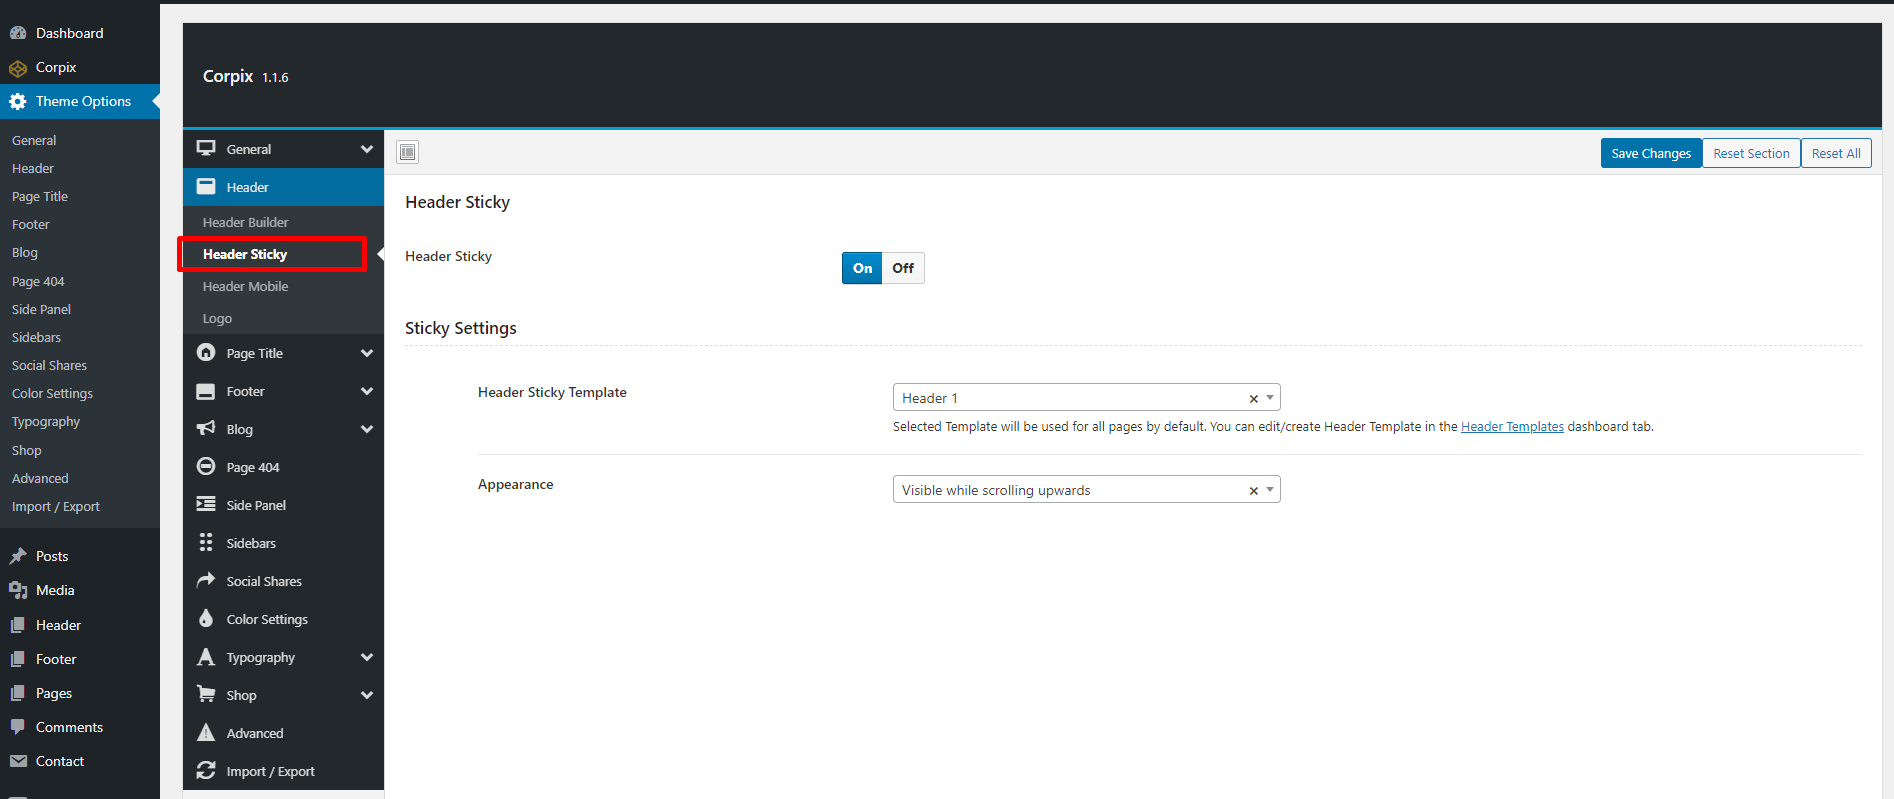
Header Sticky
In this option you can add sticky style for the header. If you turn on this option the header will stick on the top of the page. There are 2 different option on the appearance section. Selecting first one the header will always visible. And selecting 2nd one the header will visible while scrolling up. See the screenshots below
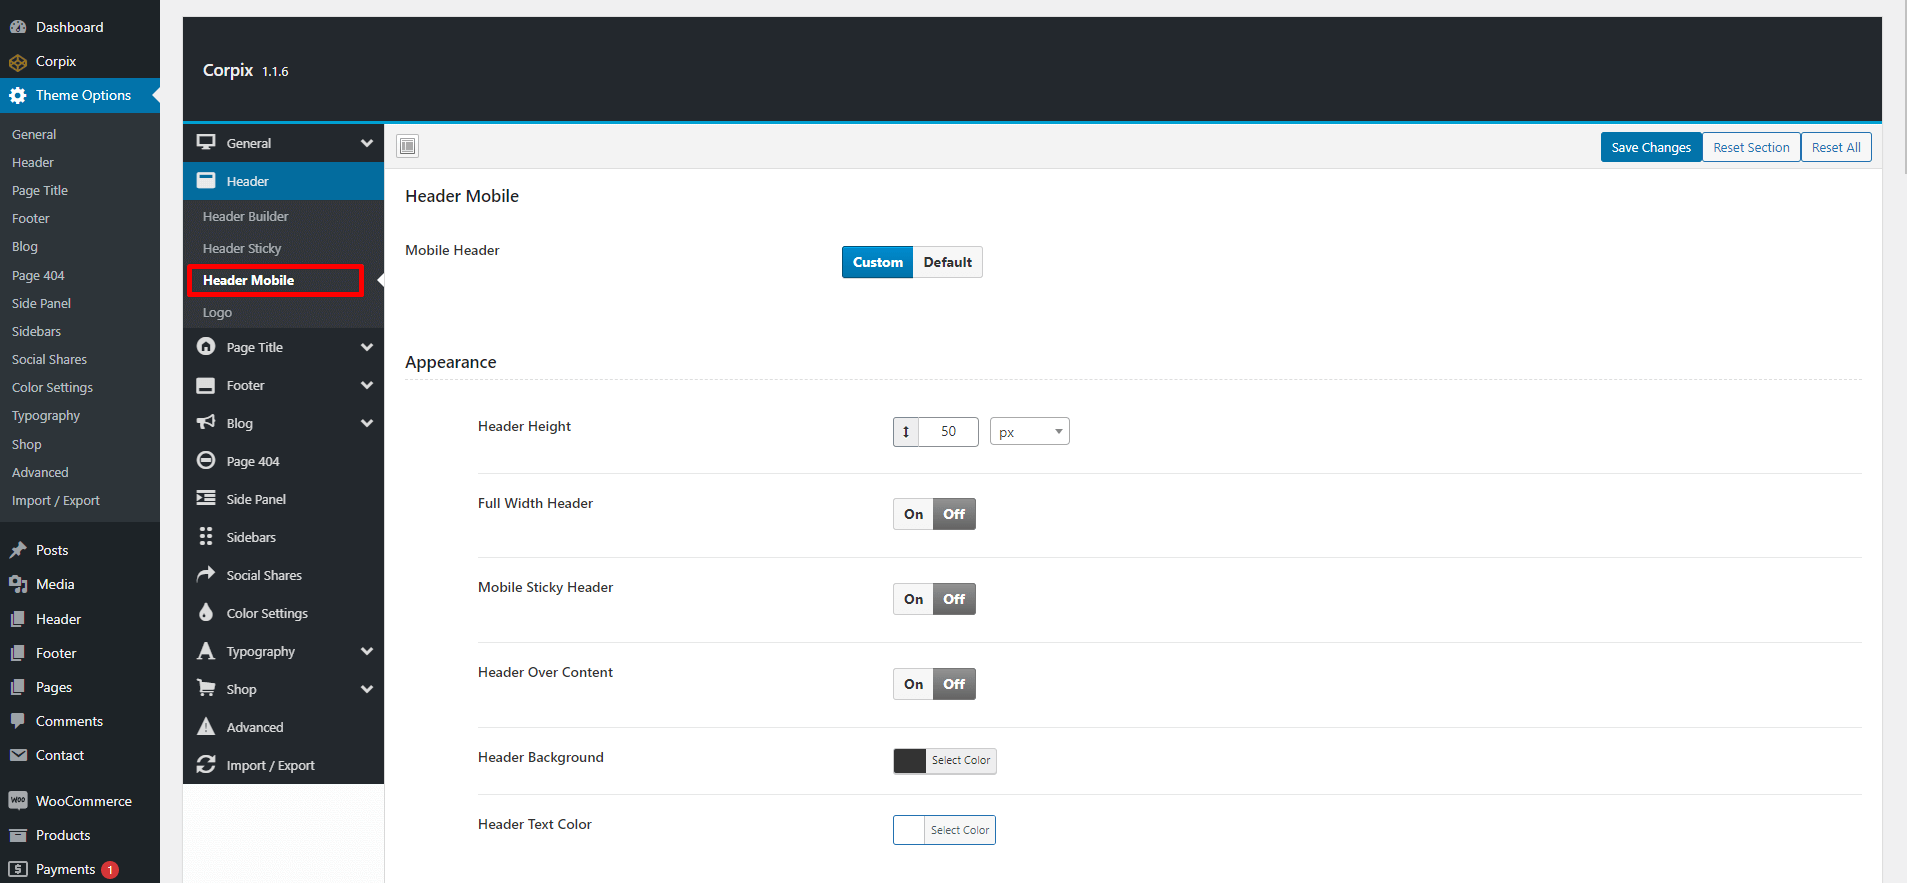
Mobile Header
In this option you can add sticky style for the header. If you turn on this option the header will stick on the top of the page. There are 2 different option on the appearance section. Selecting first one the header will always visible. And selecting 2nd one the header will visible while scrolling up. See the screenshots below
Logo
You can select your site logo from here.
![]()
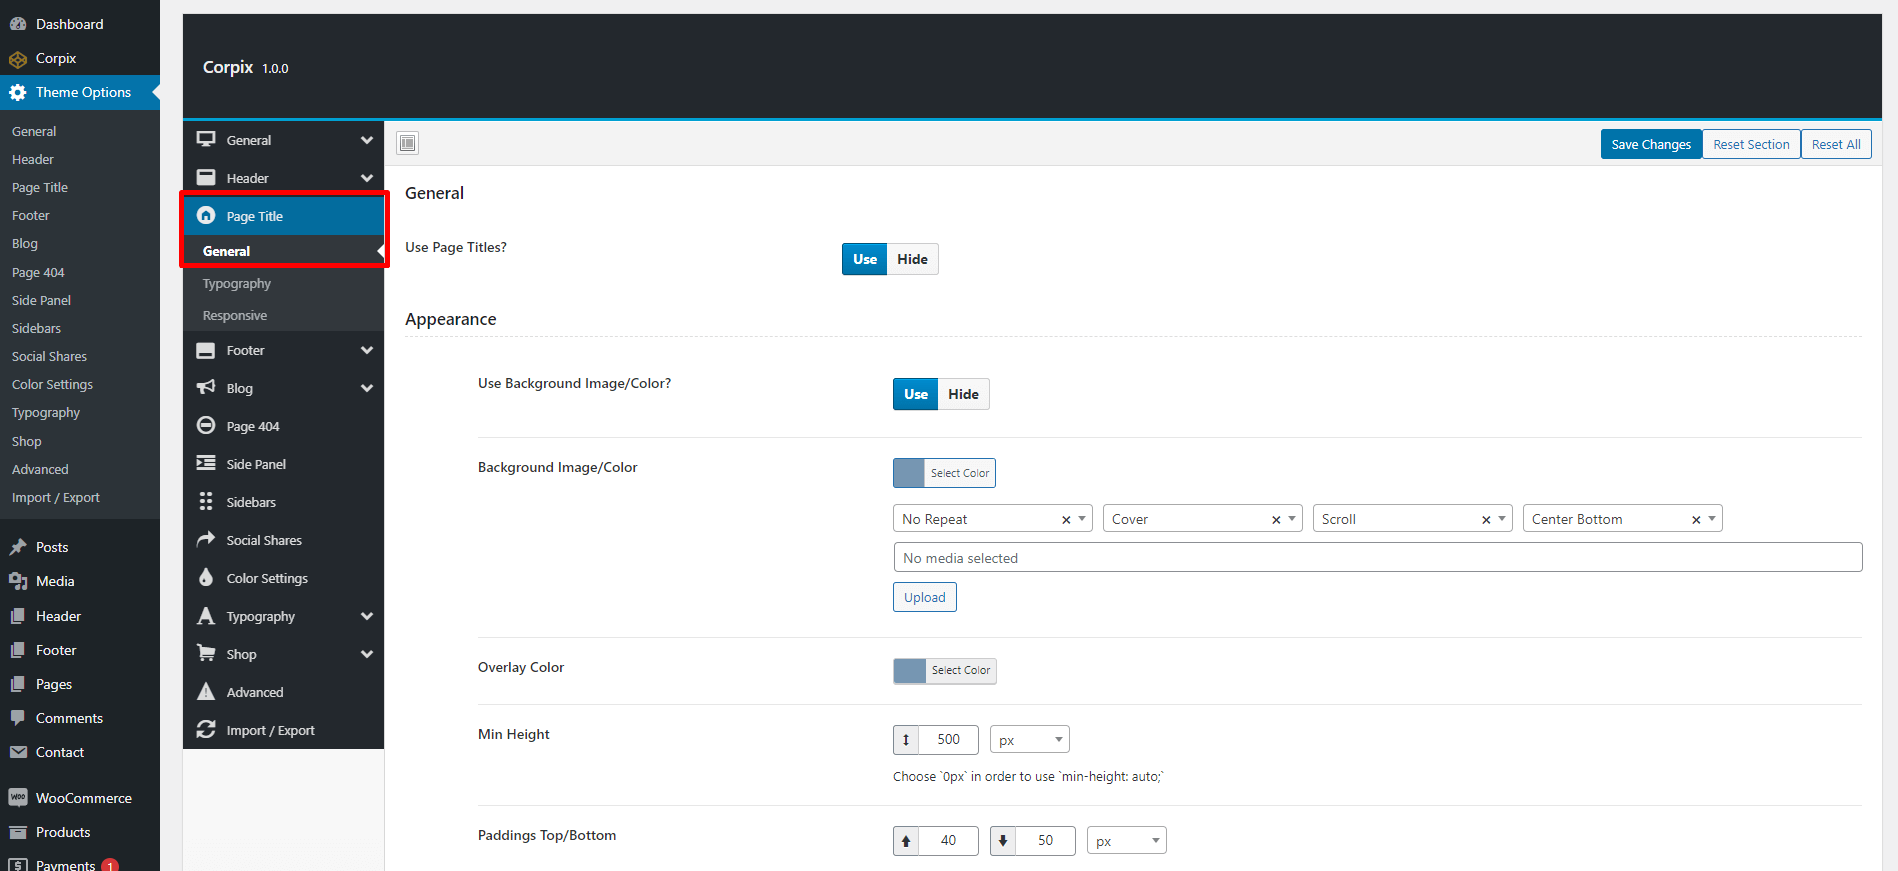
Page Title
General
Using this settings you can build your page title for every page. It's a global settings. But if you wanted to build or select page title for any individual page you can also do that and it is described in next section below.
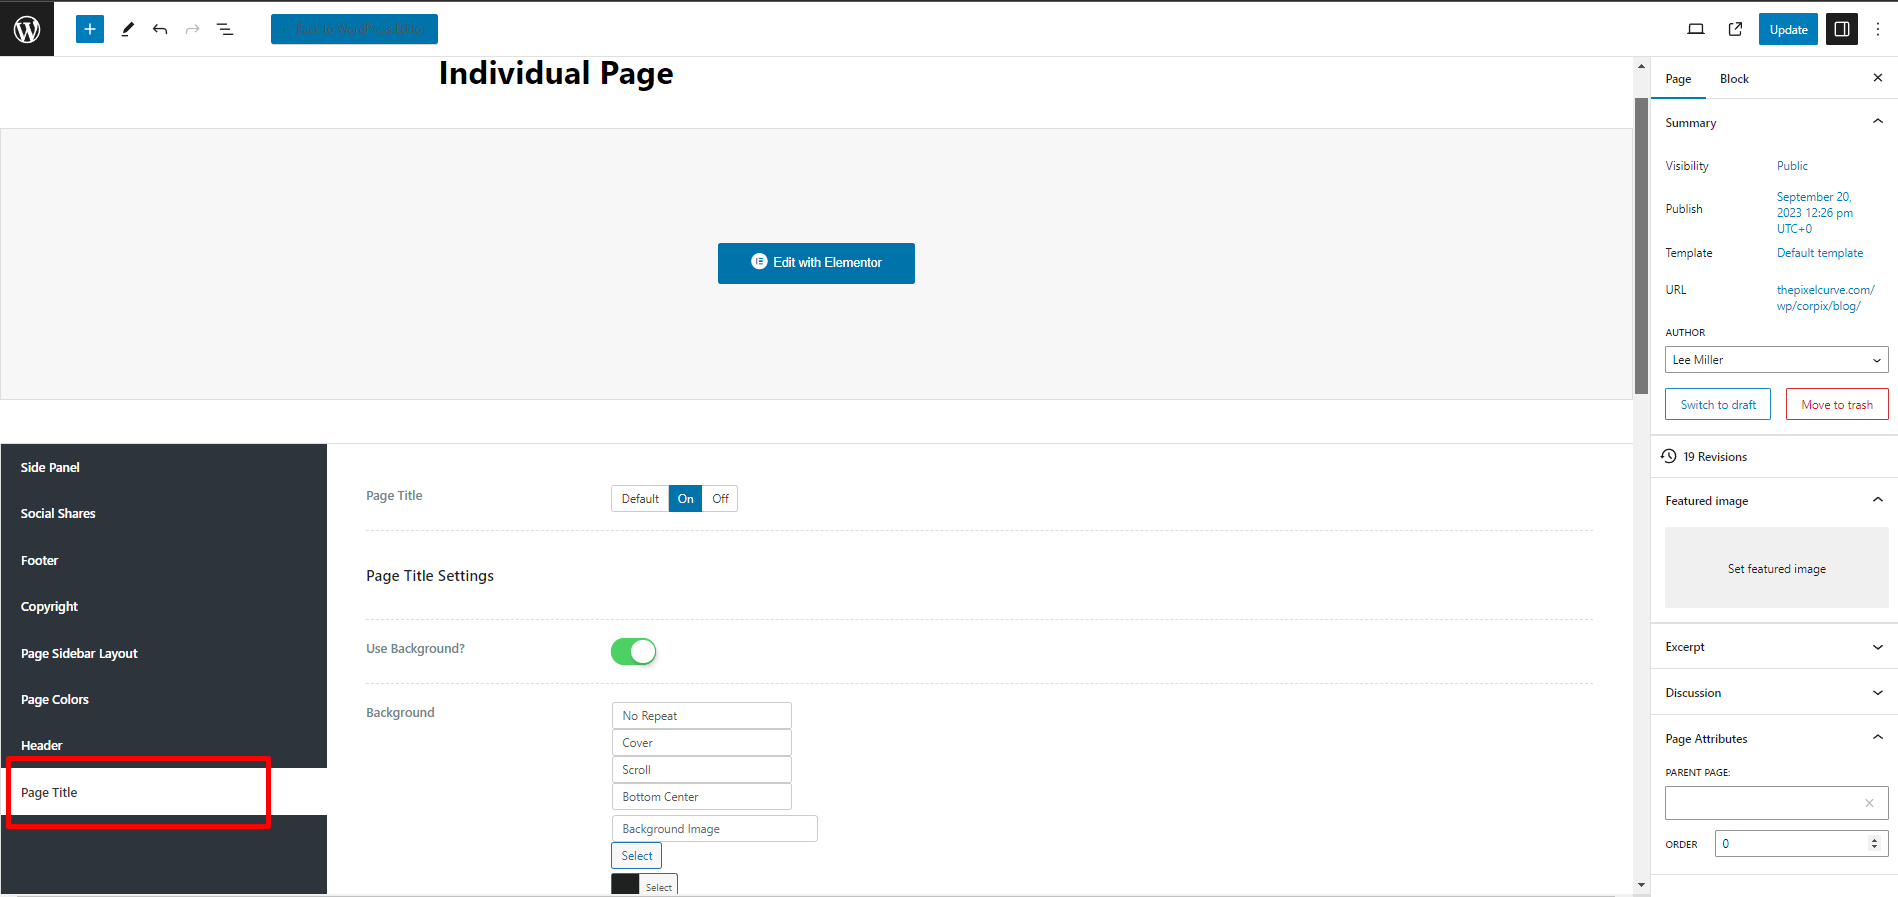
Individual Page Title
If you wanted to select or build page title for individual page you can do that by turning on page tilte from that page editor. See the screenshots below.
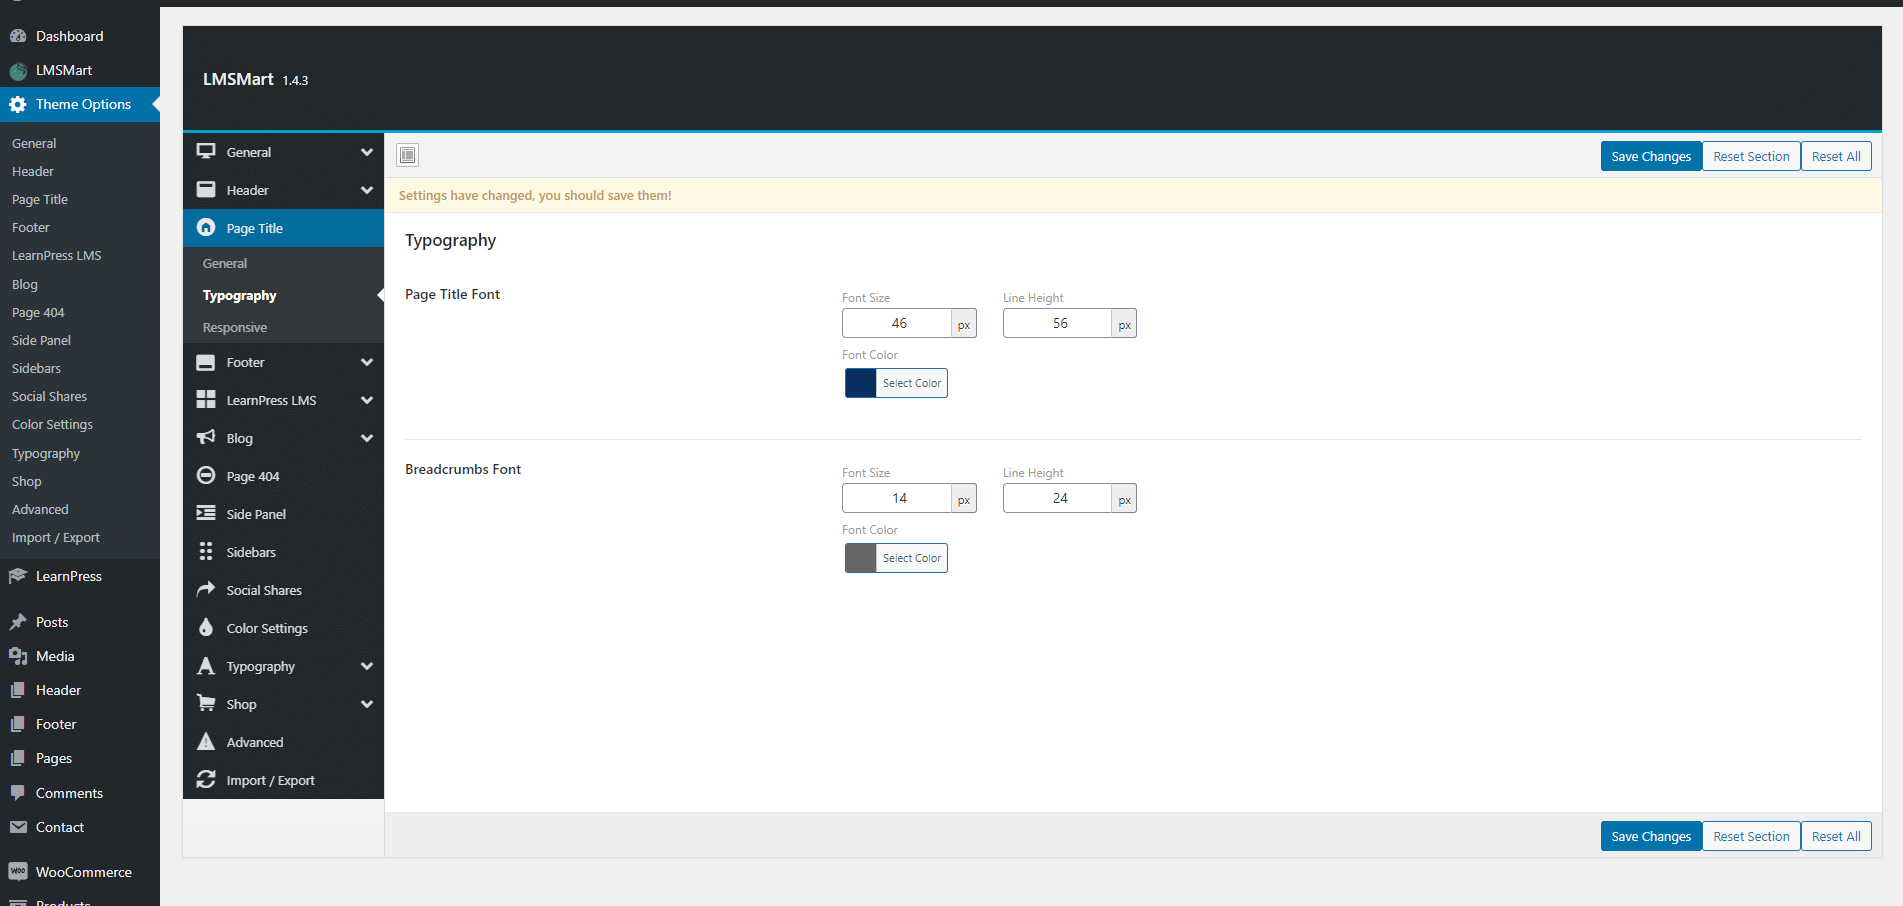
Typography
You can edit page title typography from here.
Responsive
Make page title responsive from here.

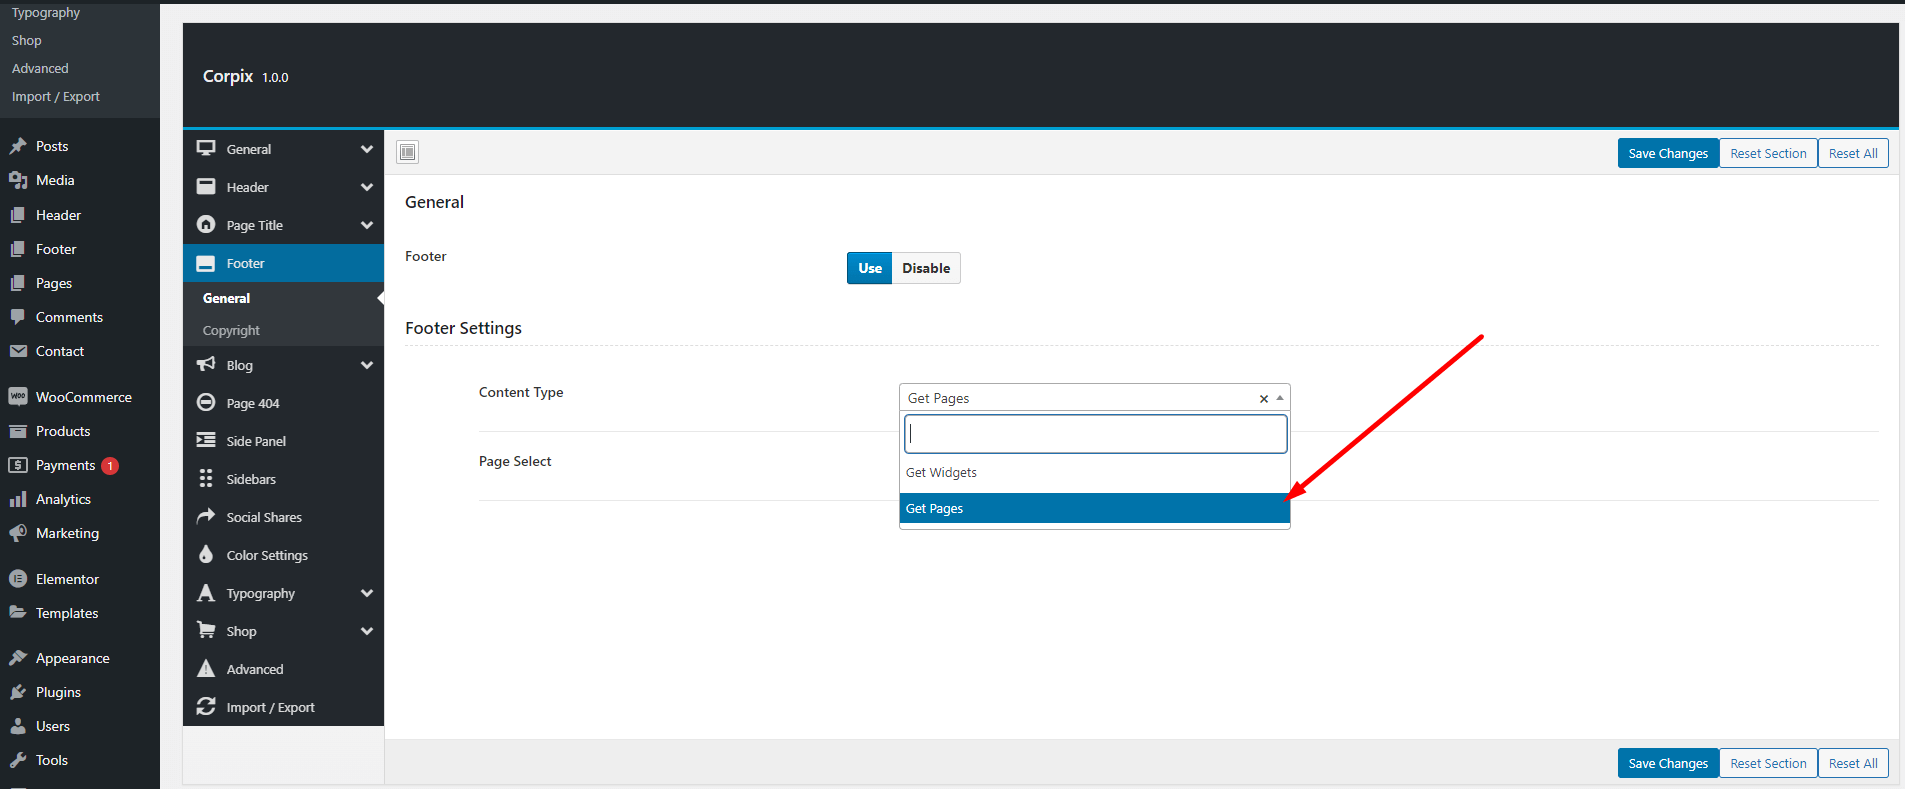
Footer
General
You can build or select your footer from here. This settings will select footer for all pages. If you build your footer using custom builder follow the screenshots below.
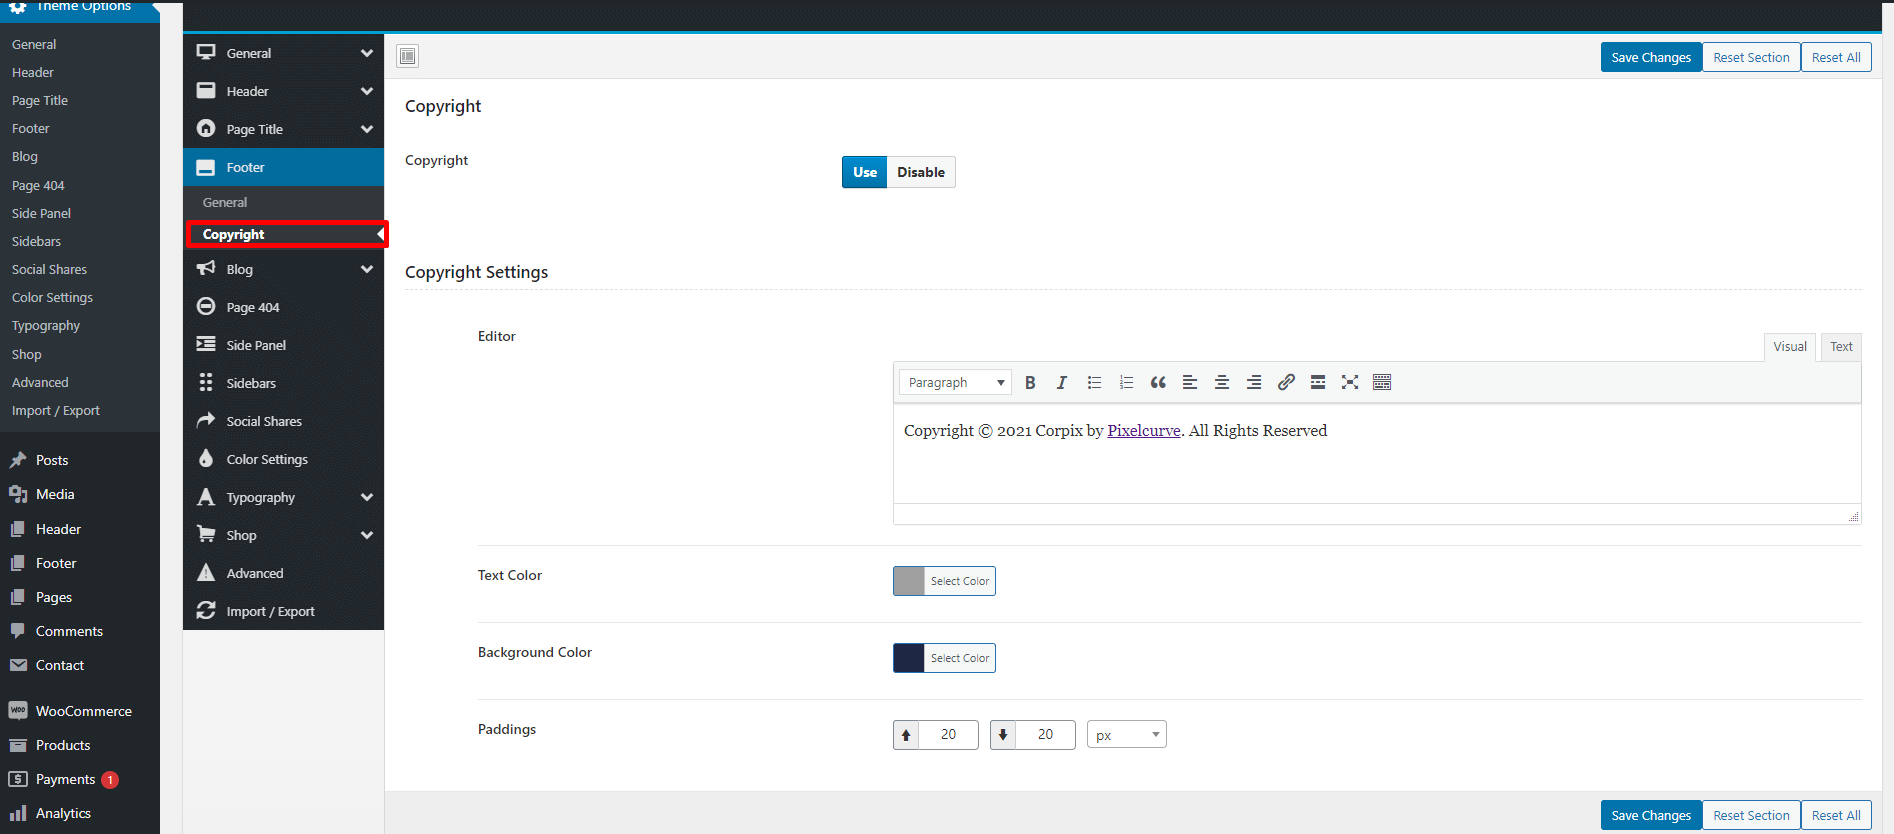
Copyright
Using this settings you can build your Copyright section.
Blog
Archive
You can Create or Edit the blog archive page from here. You'll find useful options here. You can hide or show many meta characters like Date, Author name etc from appearance section

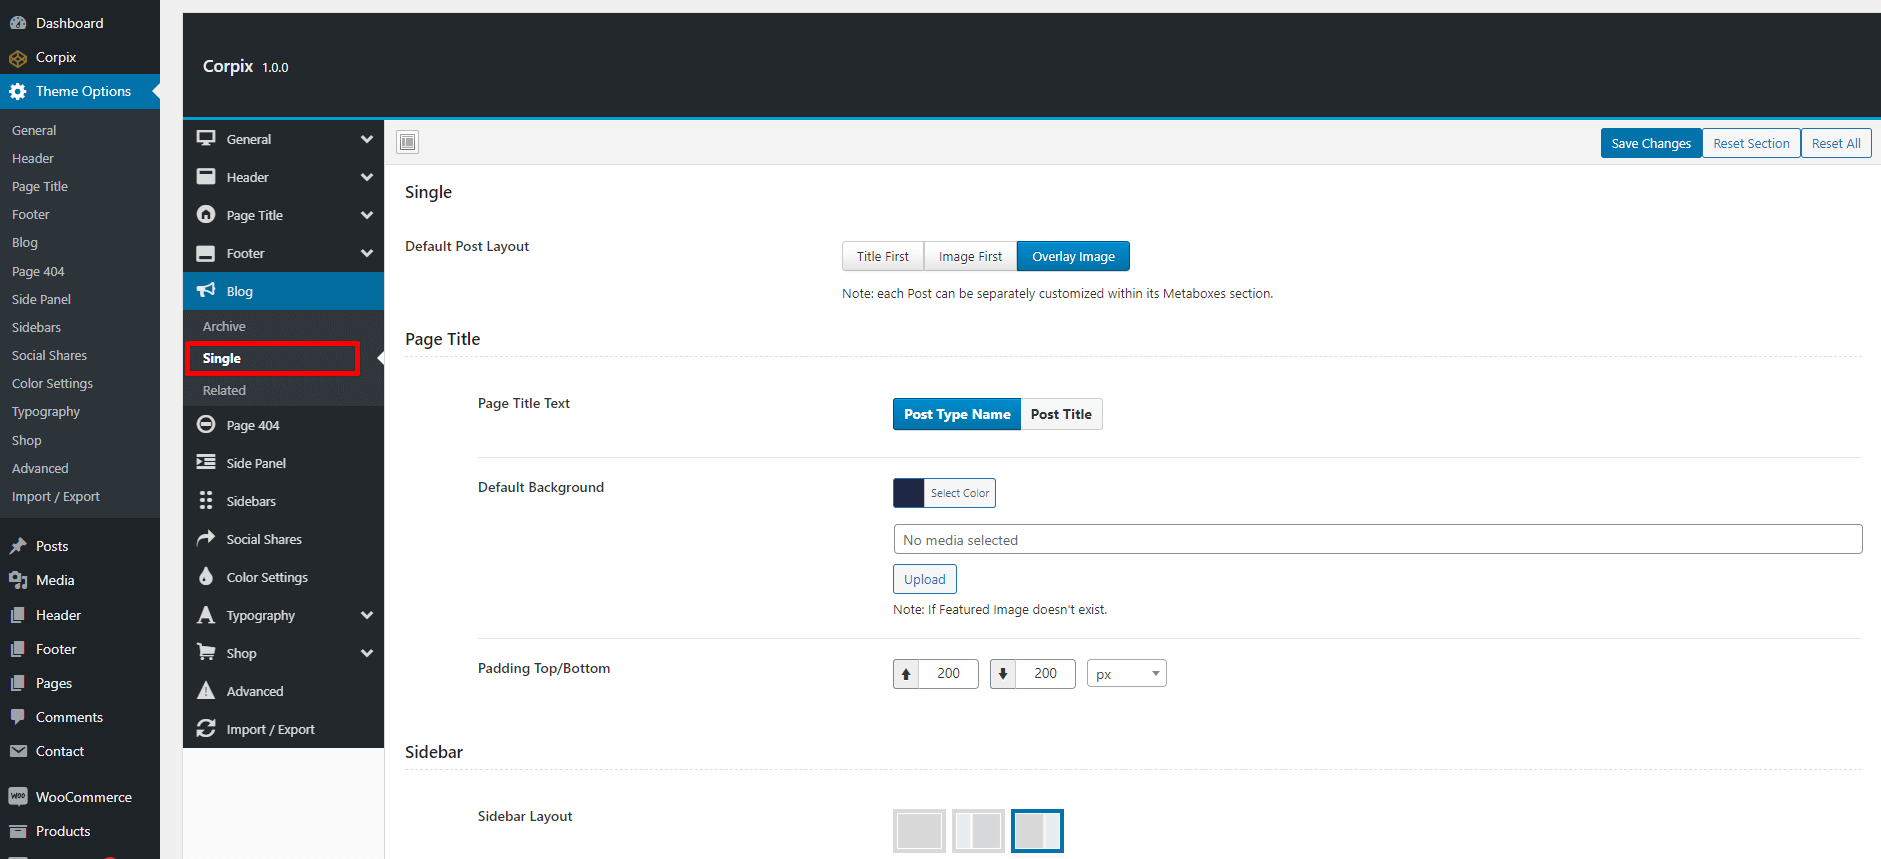
Single
You can edit blog single layout from here.
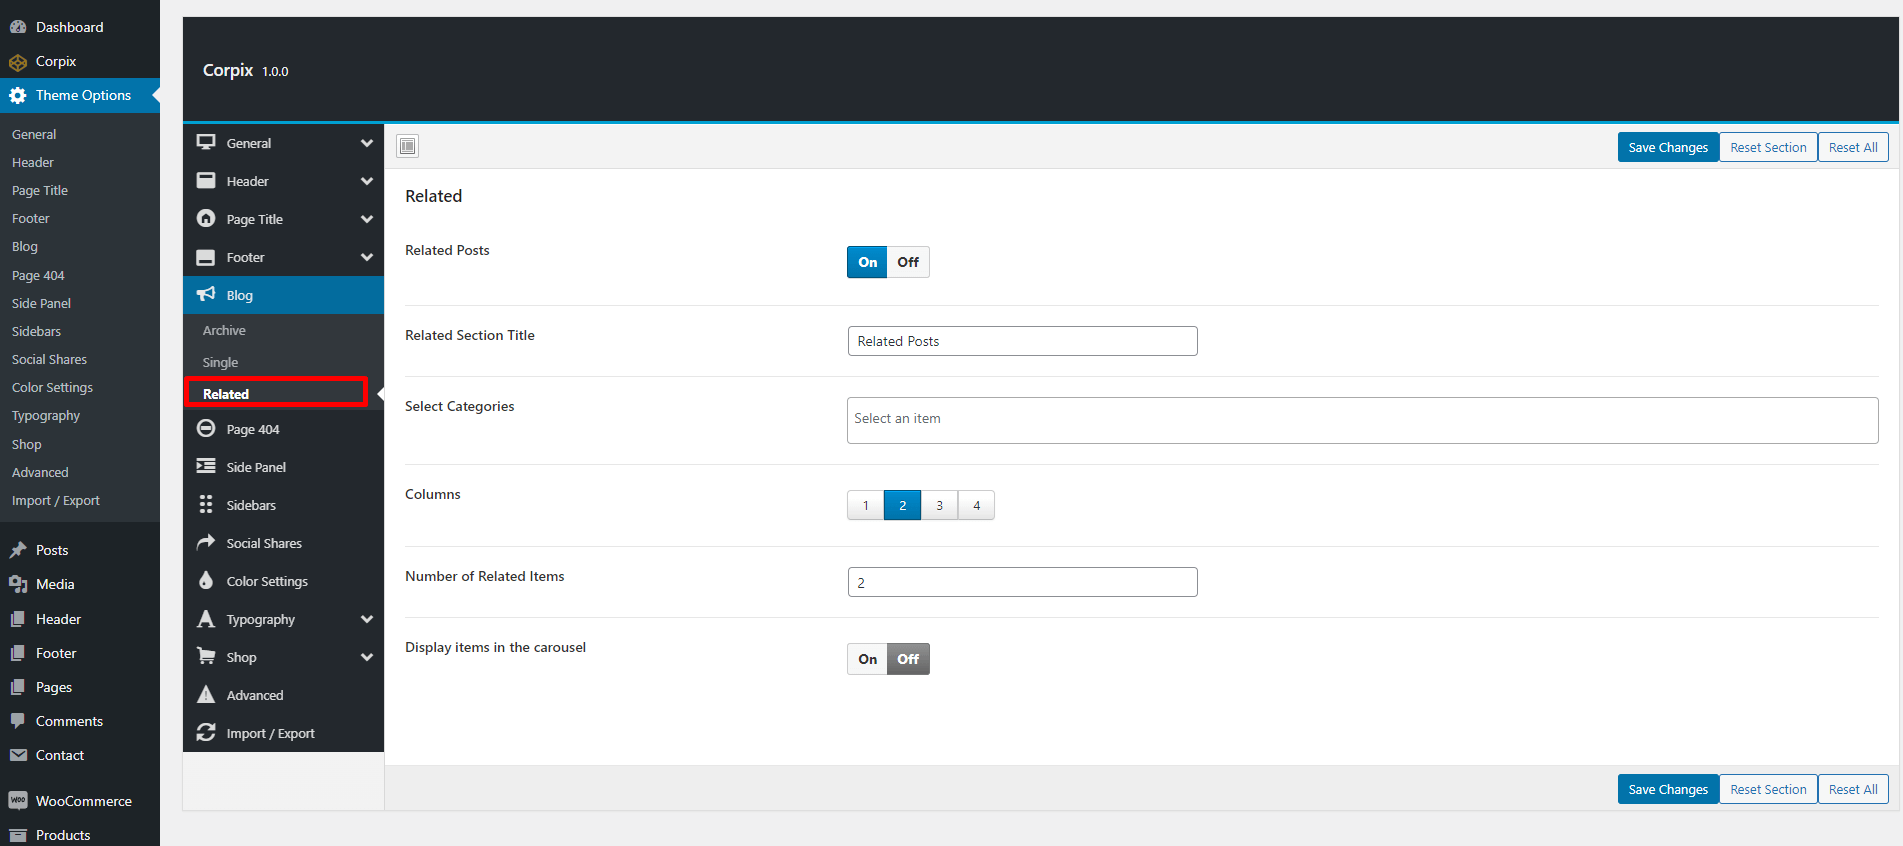
Related
You can edit blog single page related blog posts settings from here.
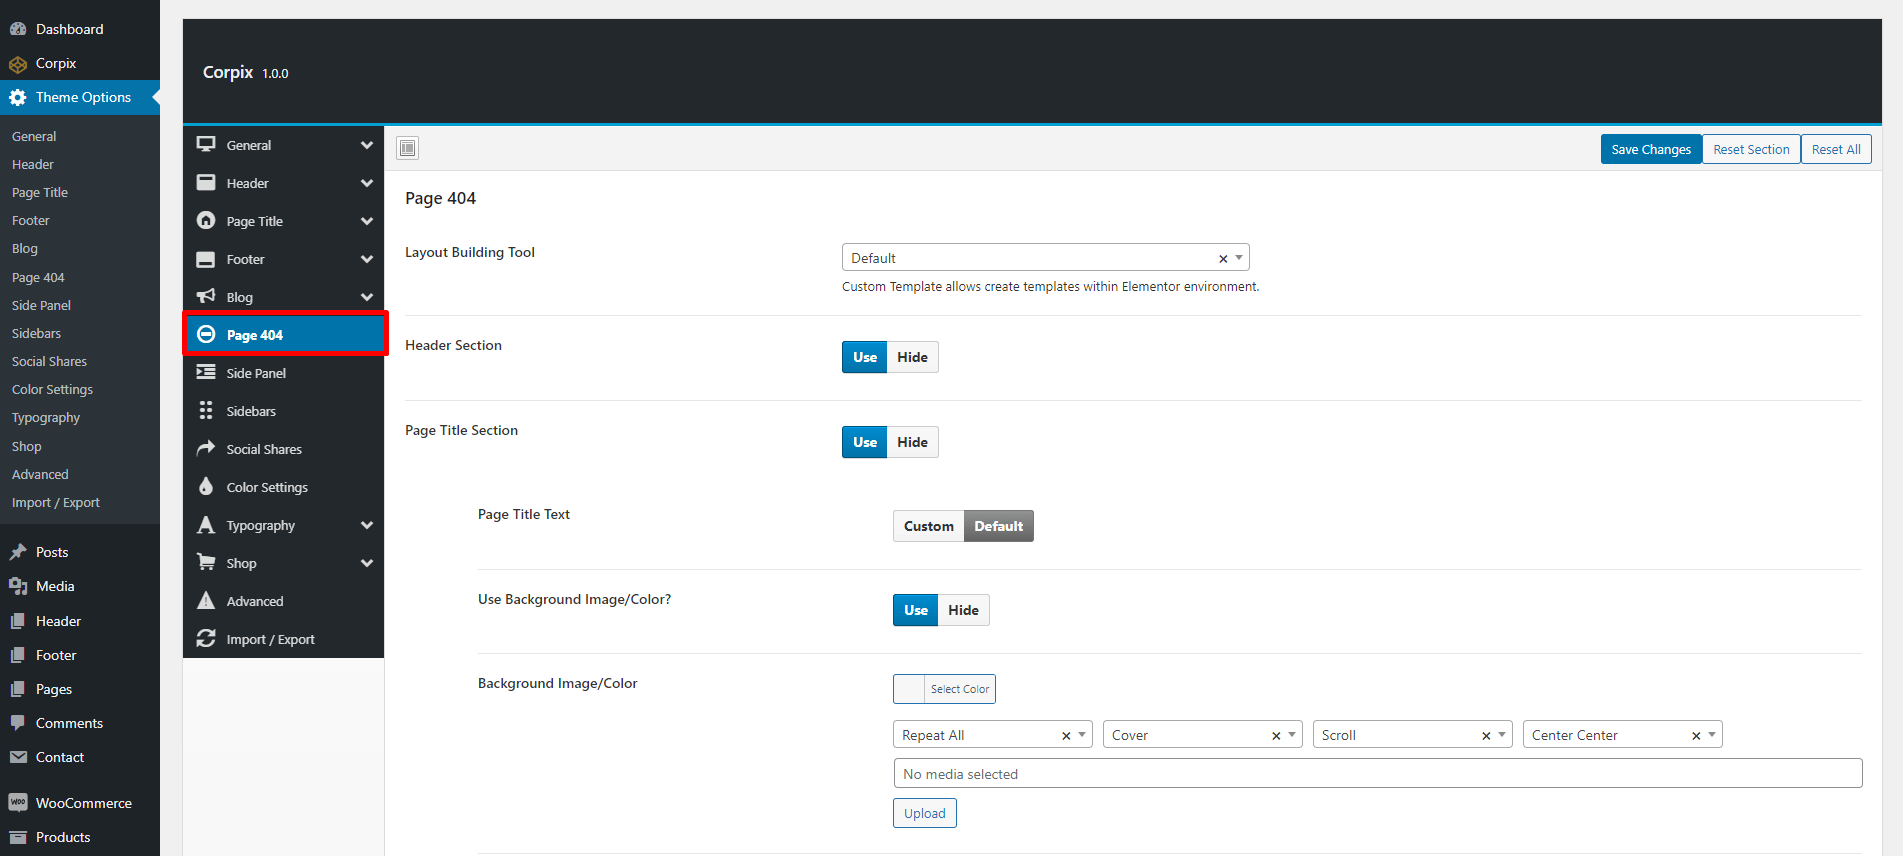
Page 404
You can edit 404 Not found page layout settings from here.
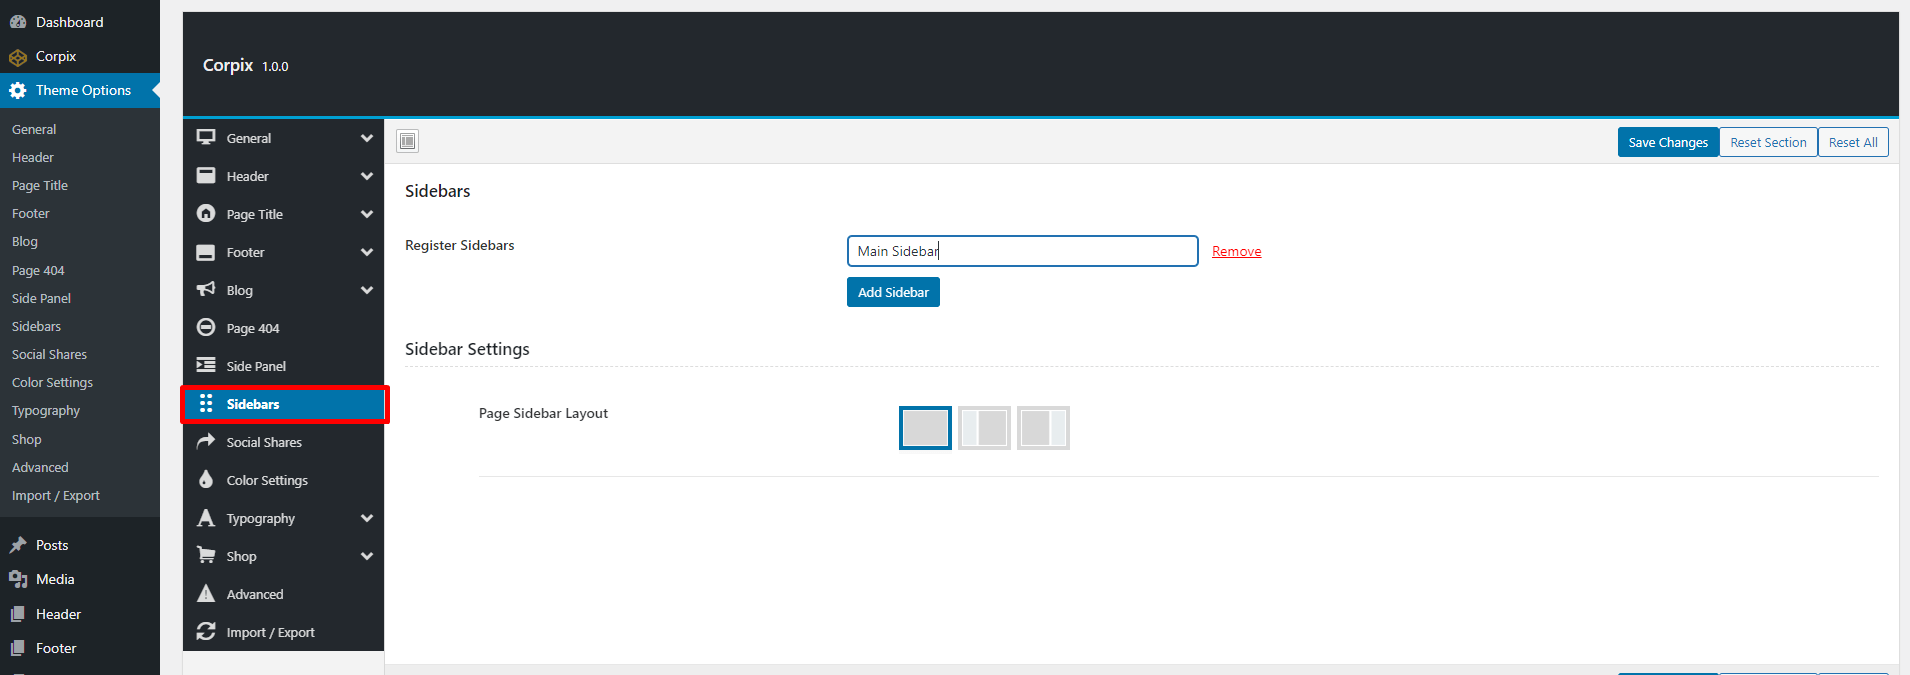
Sidebar
You can get global sidebar and sidebar layout settings from here.
Social Shares
You can add social icon links from here.

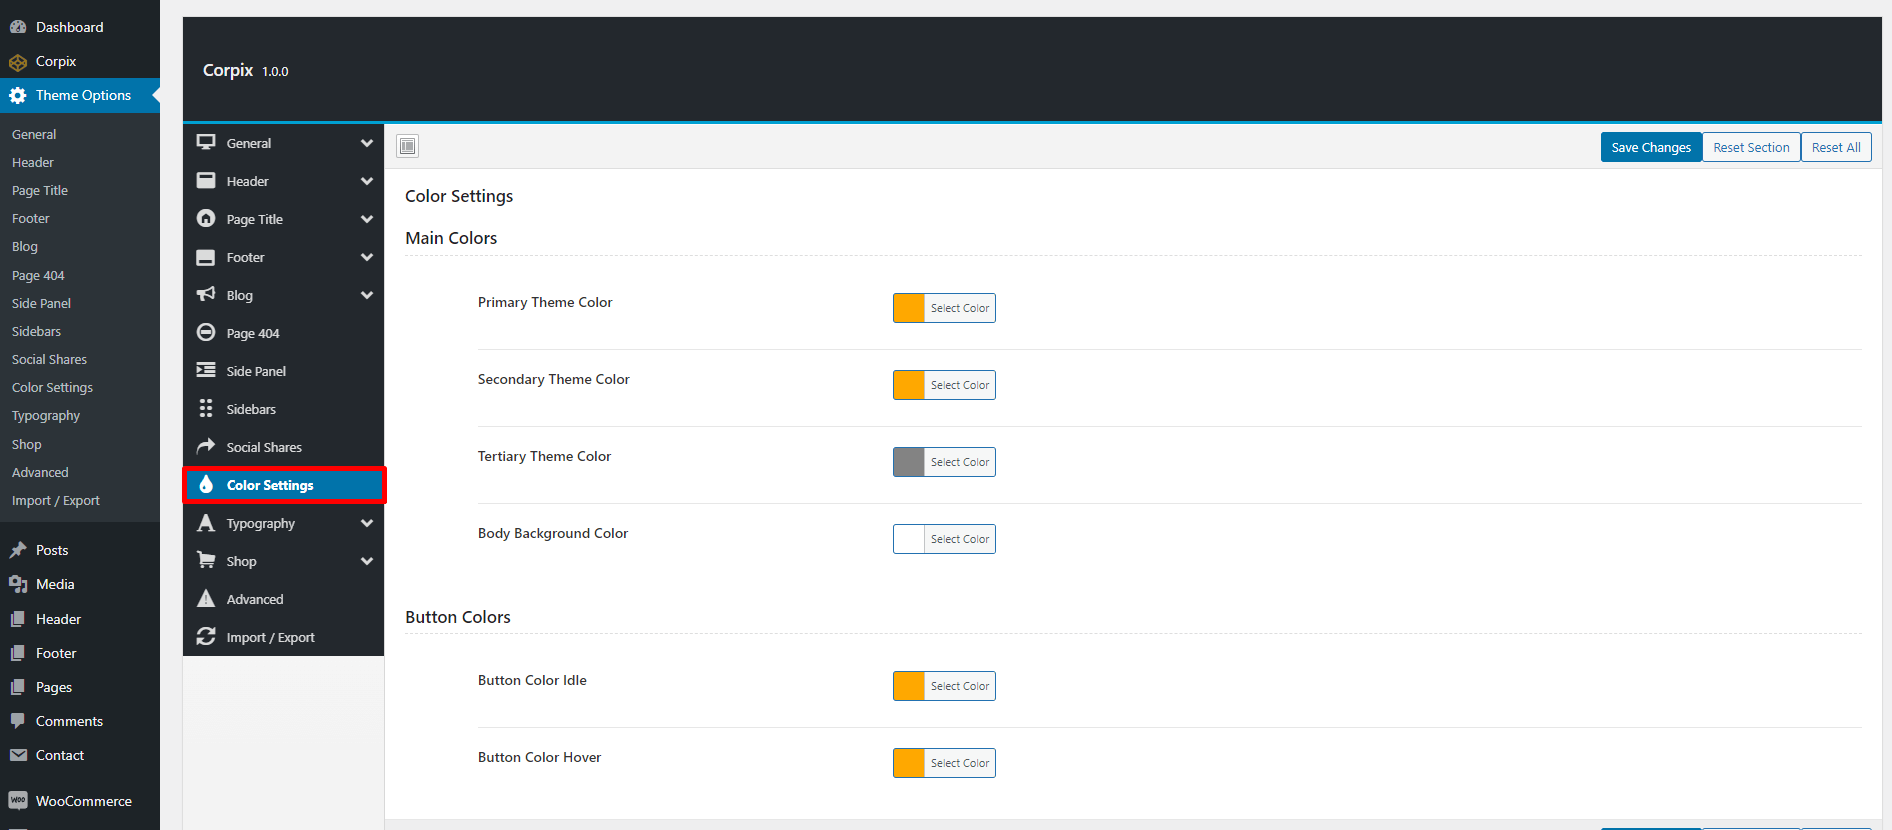
Colors Settings
You can select global theme colors from here. You can change primary color, secondary color, text color, button color etc.
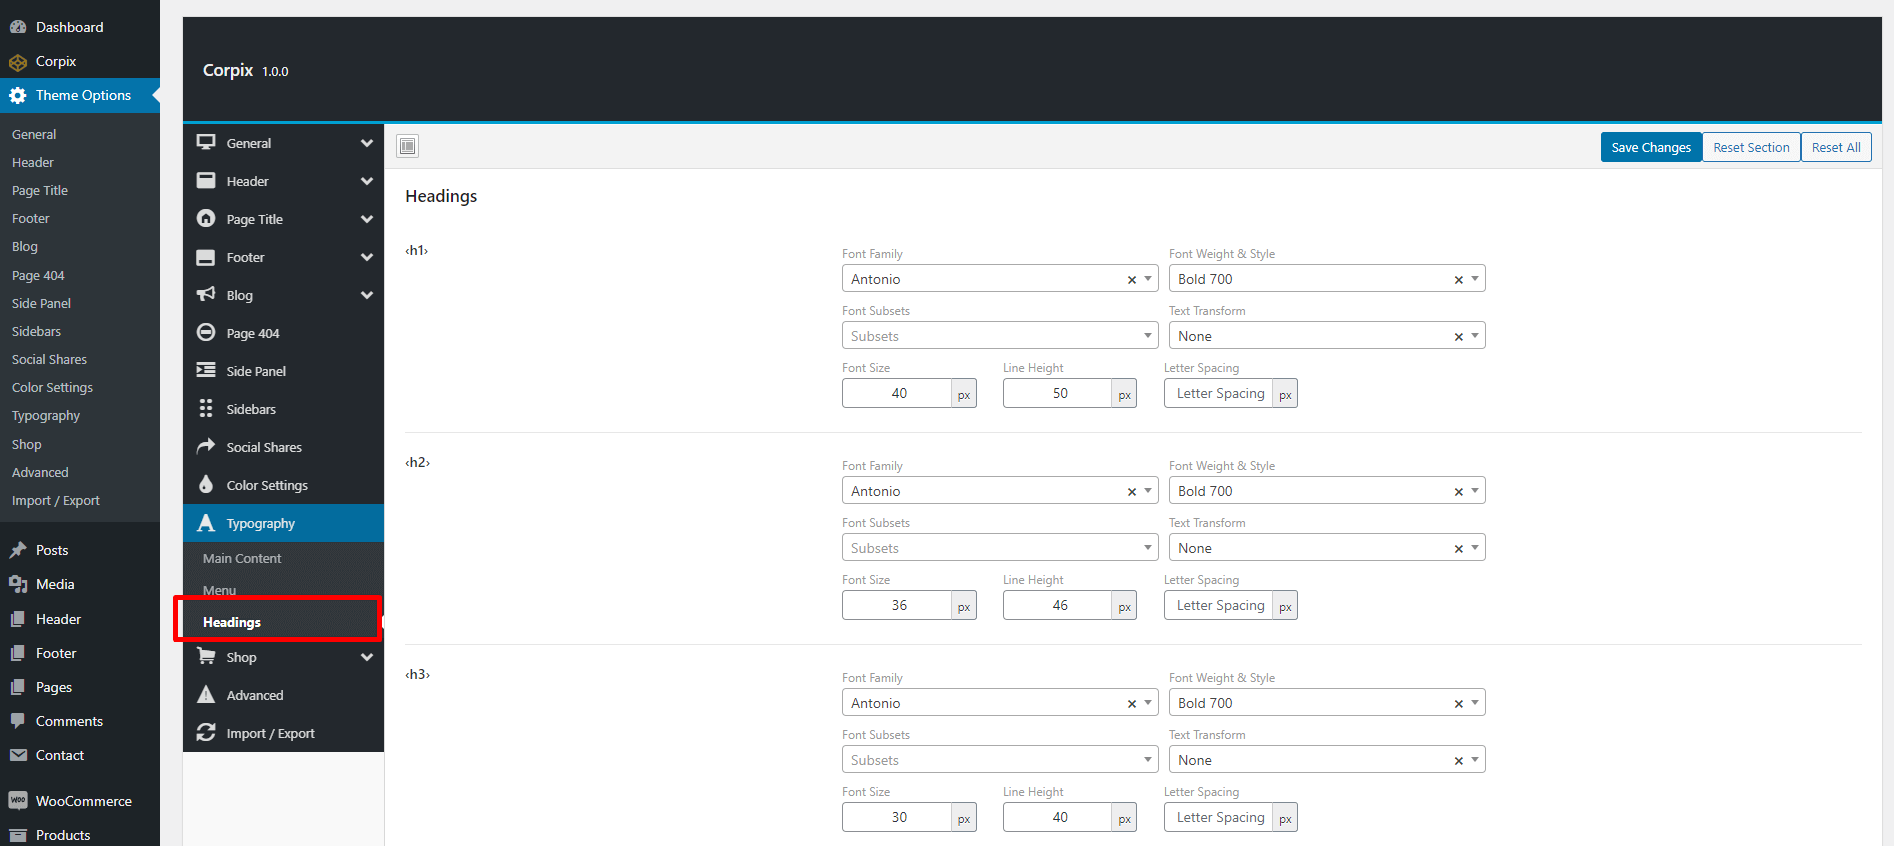
Typography
Using this option you can change Font, color, Font weight, Font Size etc for every page. It's a global settings
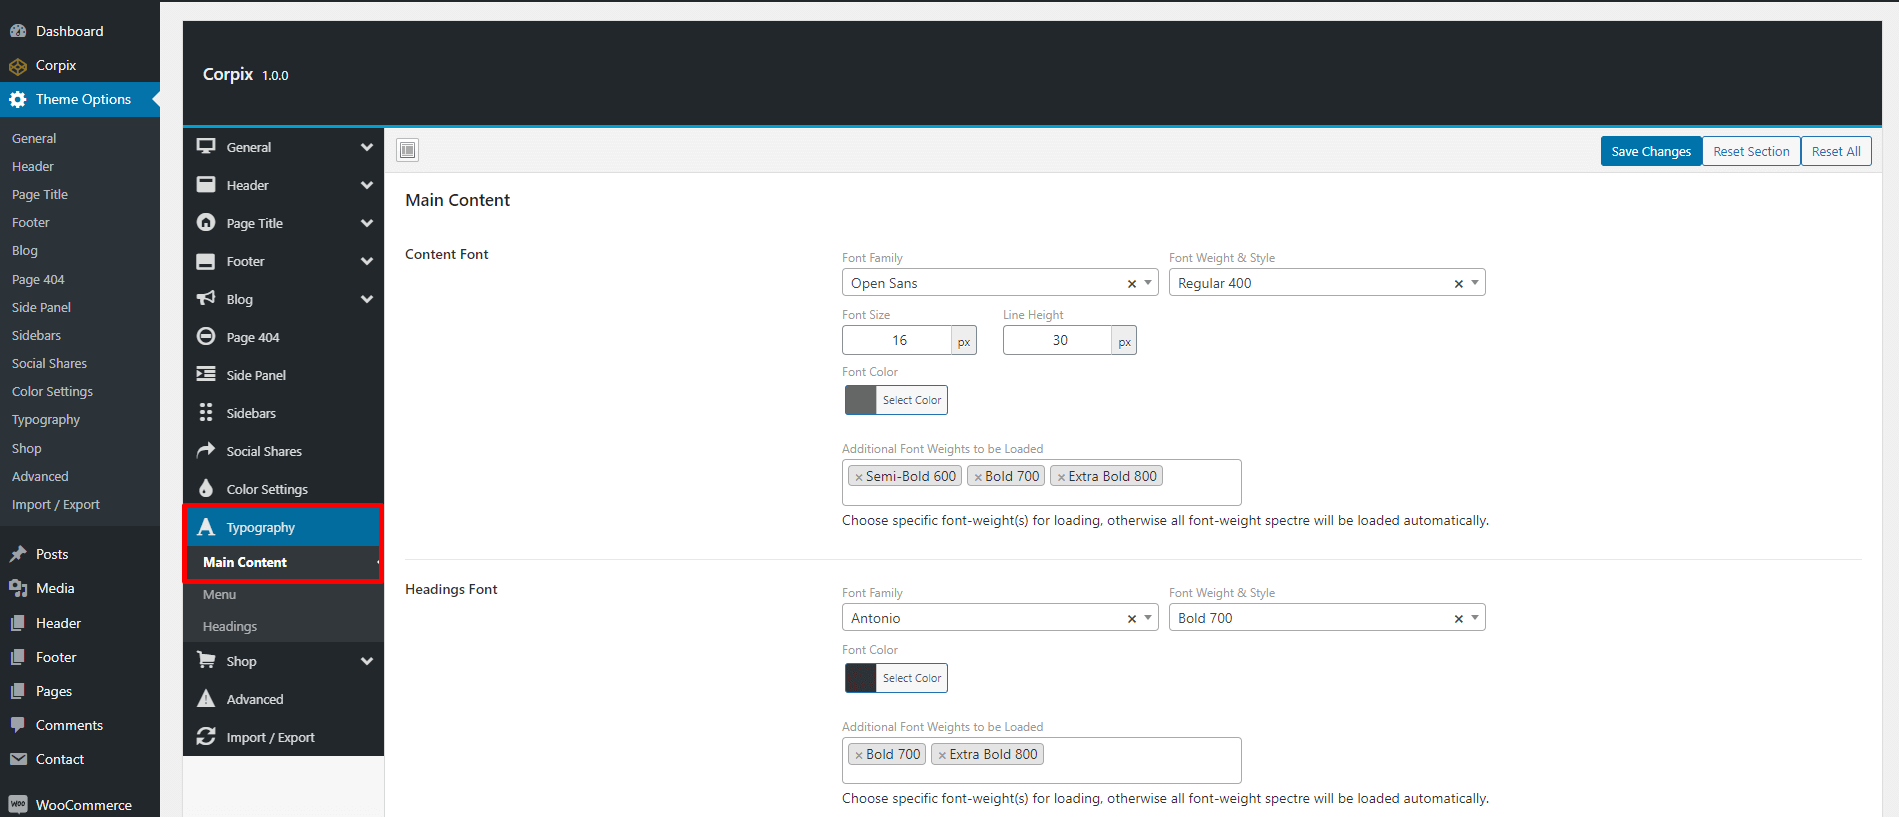
Main Content
In this section of typography you can change Font family, Font size, text color, heading font, body font of every page. See the screenshots below.
Menu
In this section you can set the typography of menu and submenu items.

Heading
In the section you can change all kind of heading typography on you site.
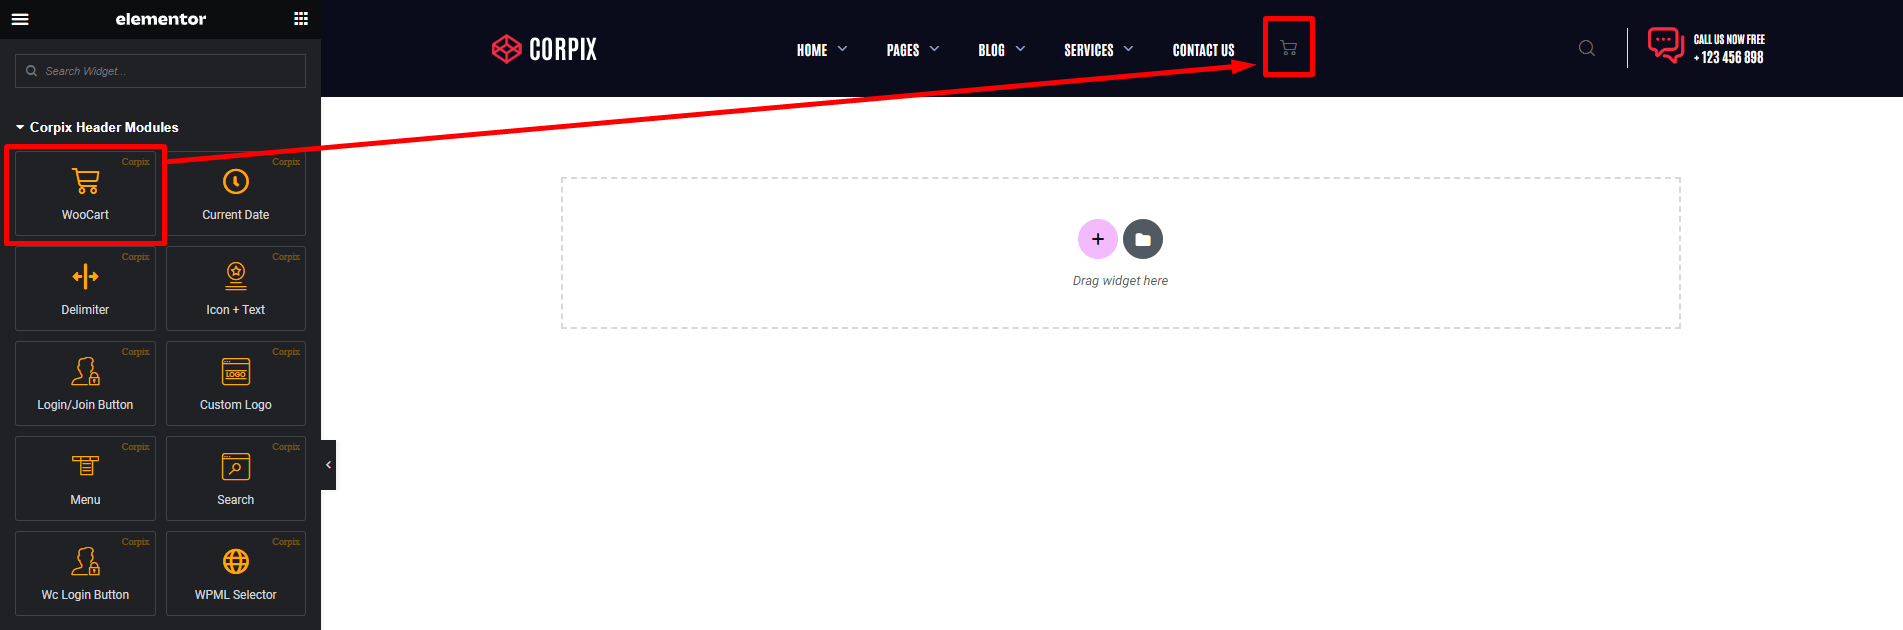
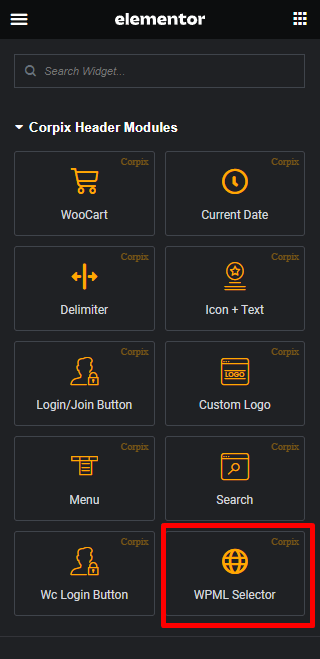
Corpix Header Modules
We have created several elementor elements for header area. You can find them from Corpix Header Modules in the elementor widget section, You'll find header related elements to build the header. Follow the discussions below.

WooCart
Using this element you can add cart button in the header. See the screenshot below.
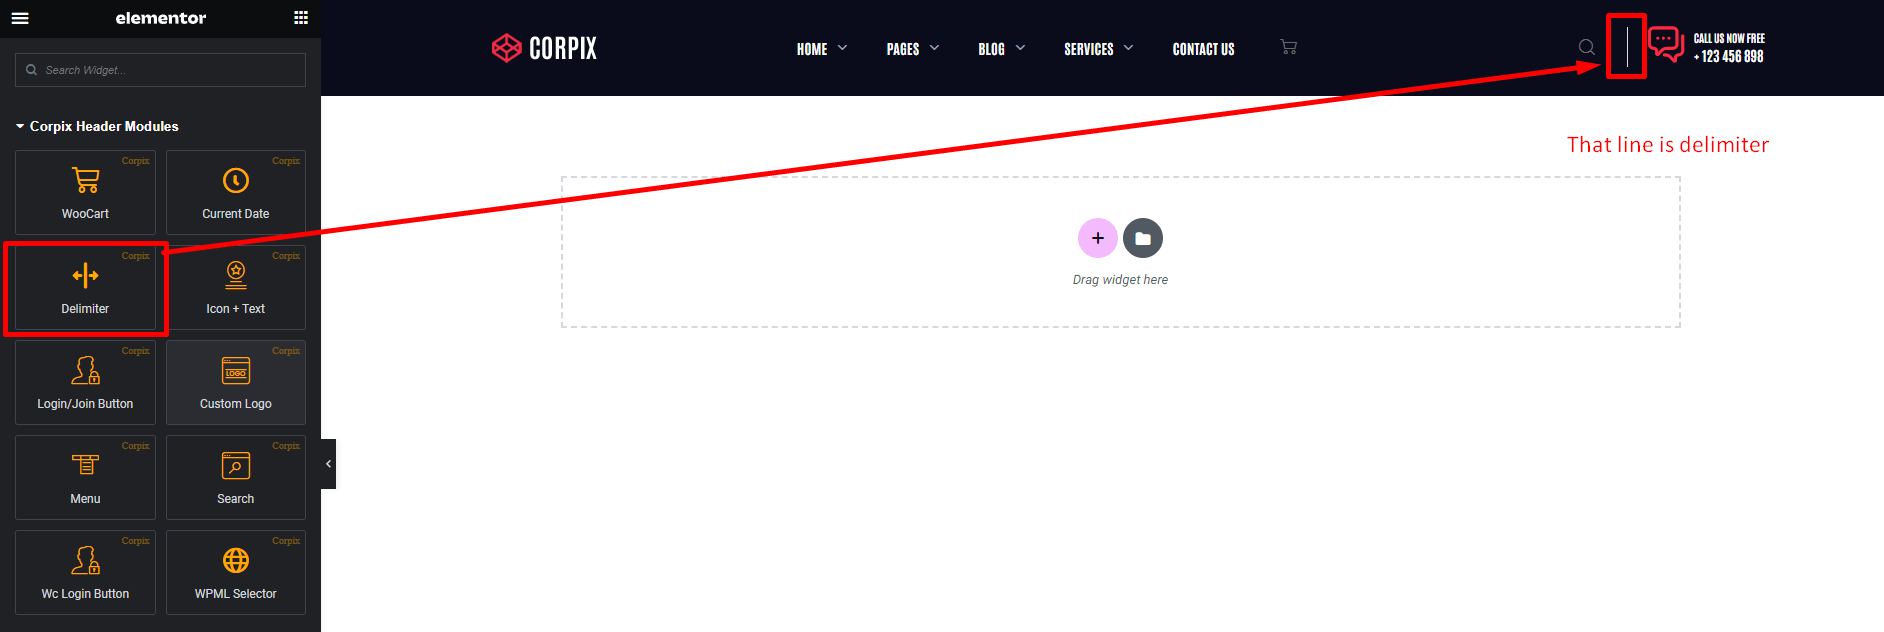
Delimiter
Using this element you can add a vertical line as a separator. See the screenshot to understand.
Custom Logo
Using this element you can add logo in the header section. See the screenshot below.

Menu
Using this element you can create menu for the header like the screenshot below.

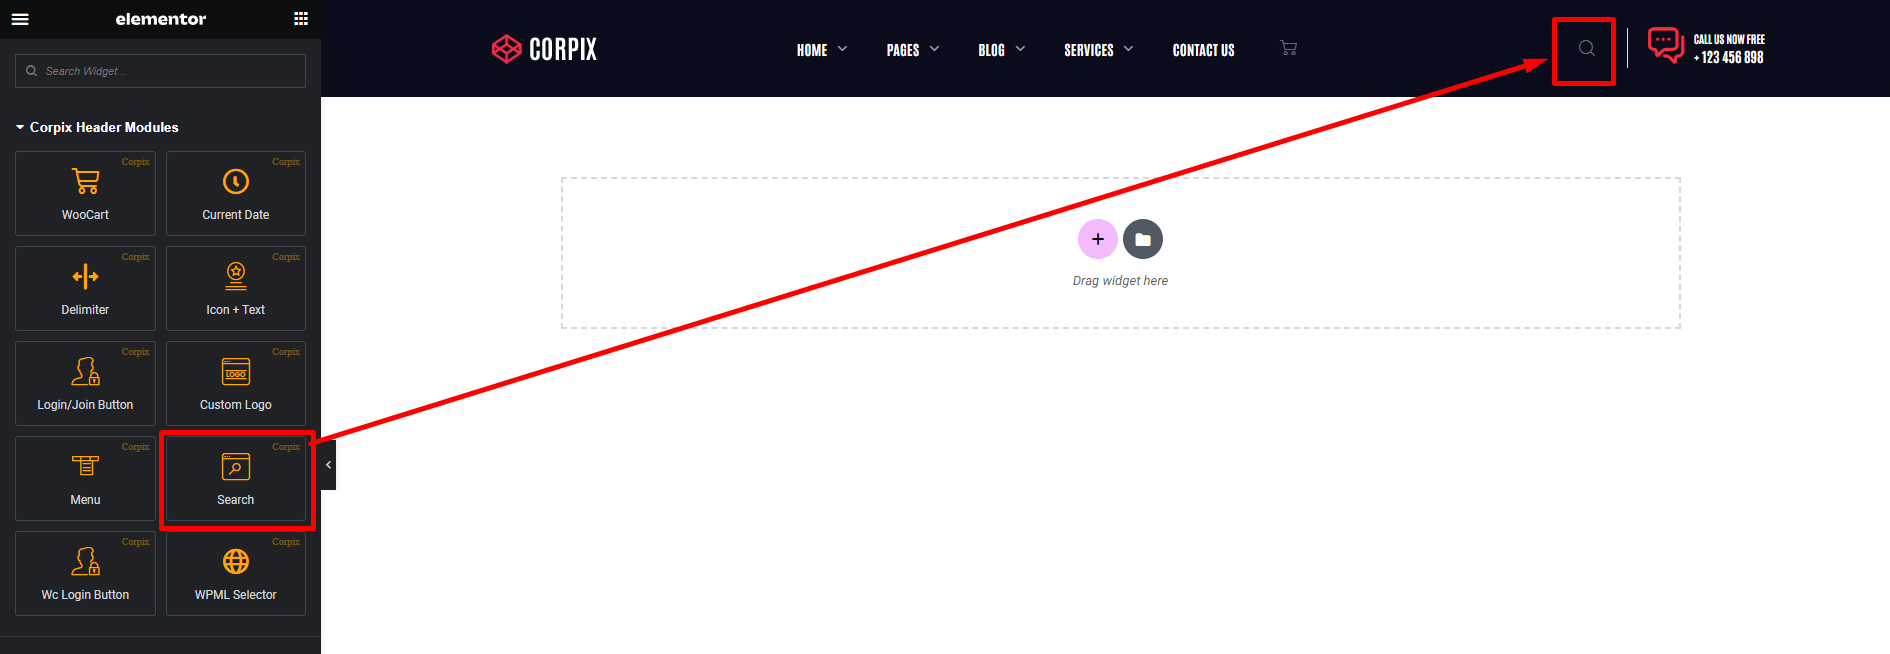
Search
Using this element you can add Search button in the header. See the screenshot below.
WPML Selector
If WPML plugin is installed in your site you can make your site multilingual using this element.
Elementor Elements
We have created several elementor elements to design our theme easily. You can find them from Corpix Addons tab in the elementor. Let's discuss with some of our created elementor elements.
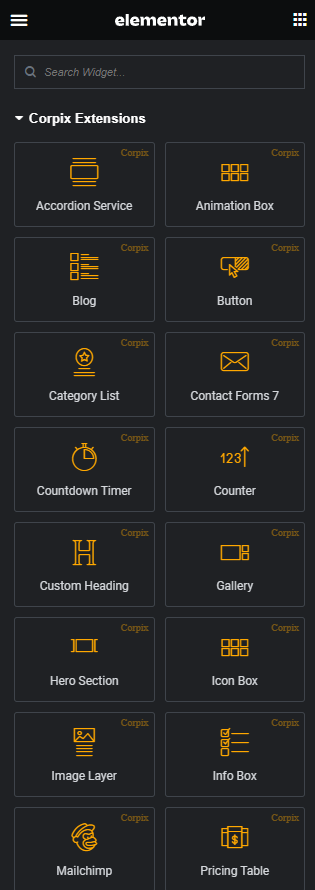
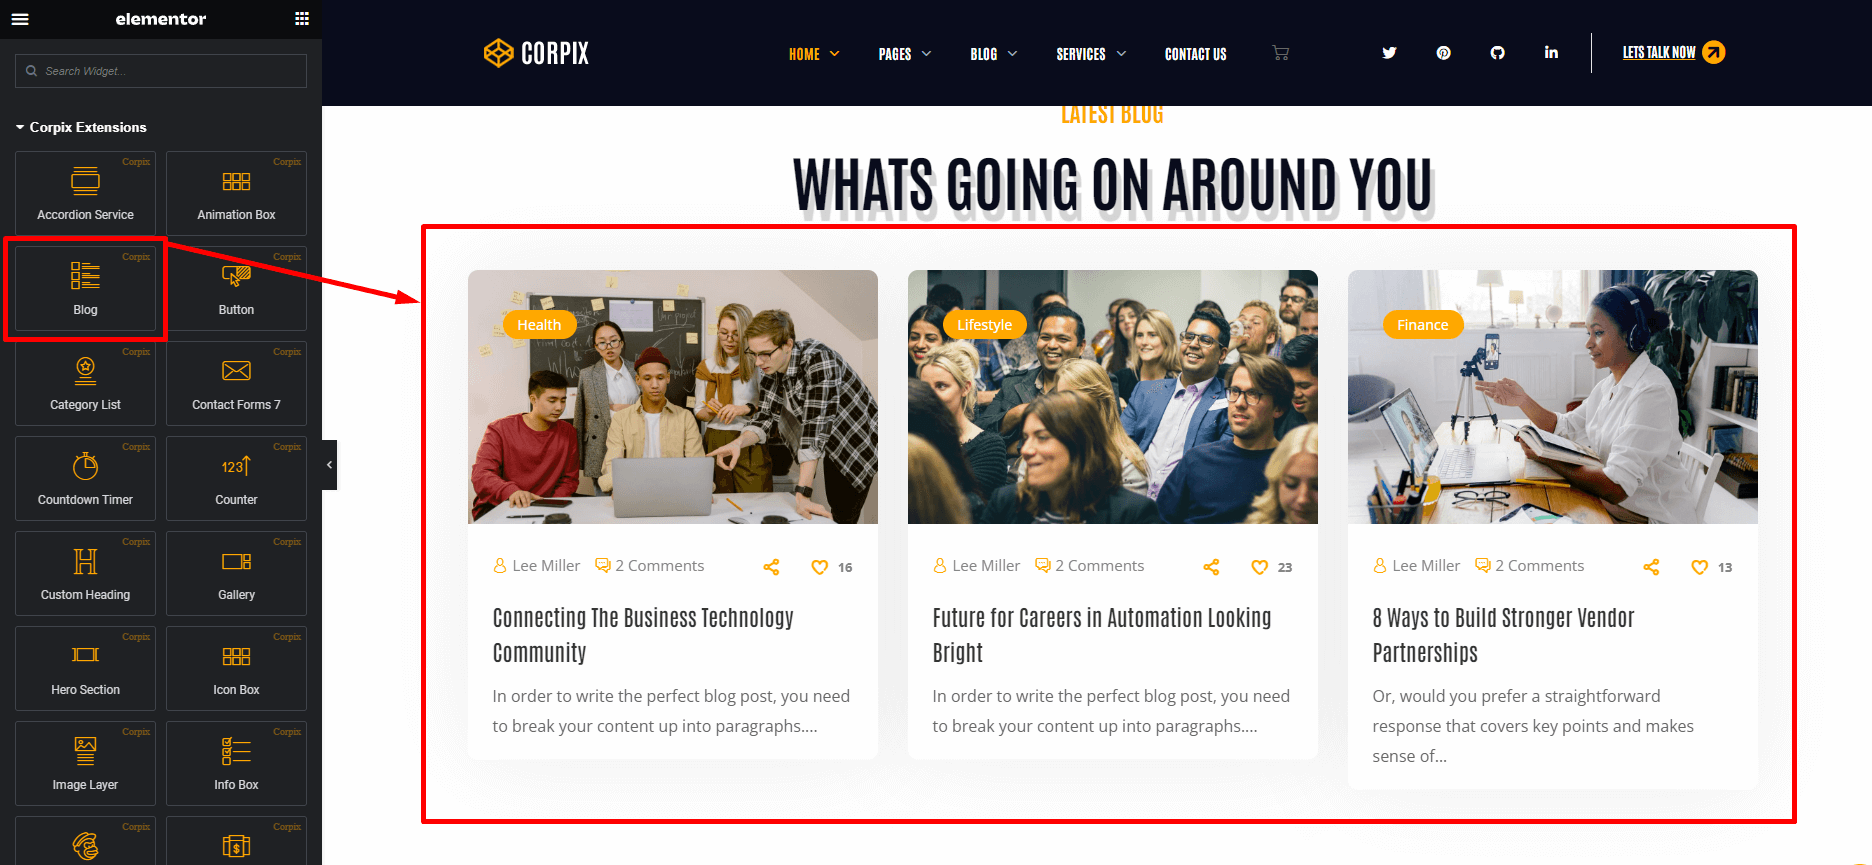
Blog
Using this element you can create awesome blog layout like in the following screenshot.You will find 2 different styles in blog element
Toggle/Accordion
Using this element you can create accordion like in the following screenshot.

Button
Using this element you can custom button like in the following screenshot.

Category List
This element will allows to make category list without carousel. Follow the screenshot. You will find 3 different styles in category list

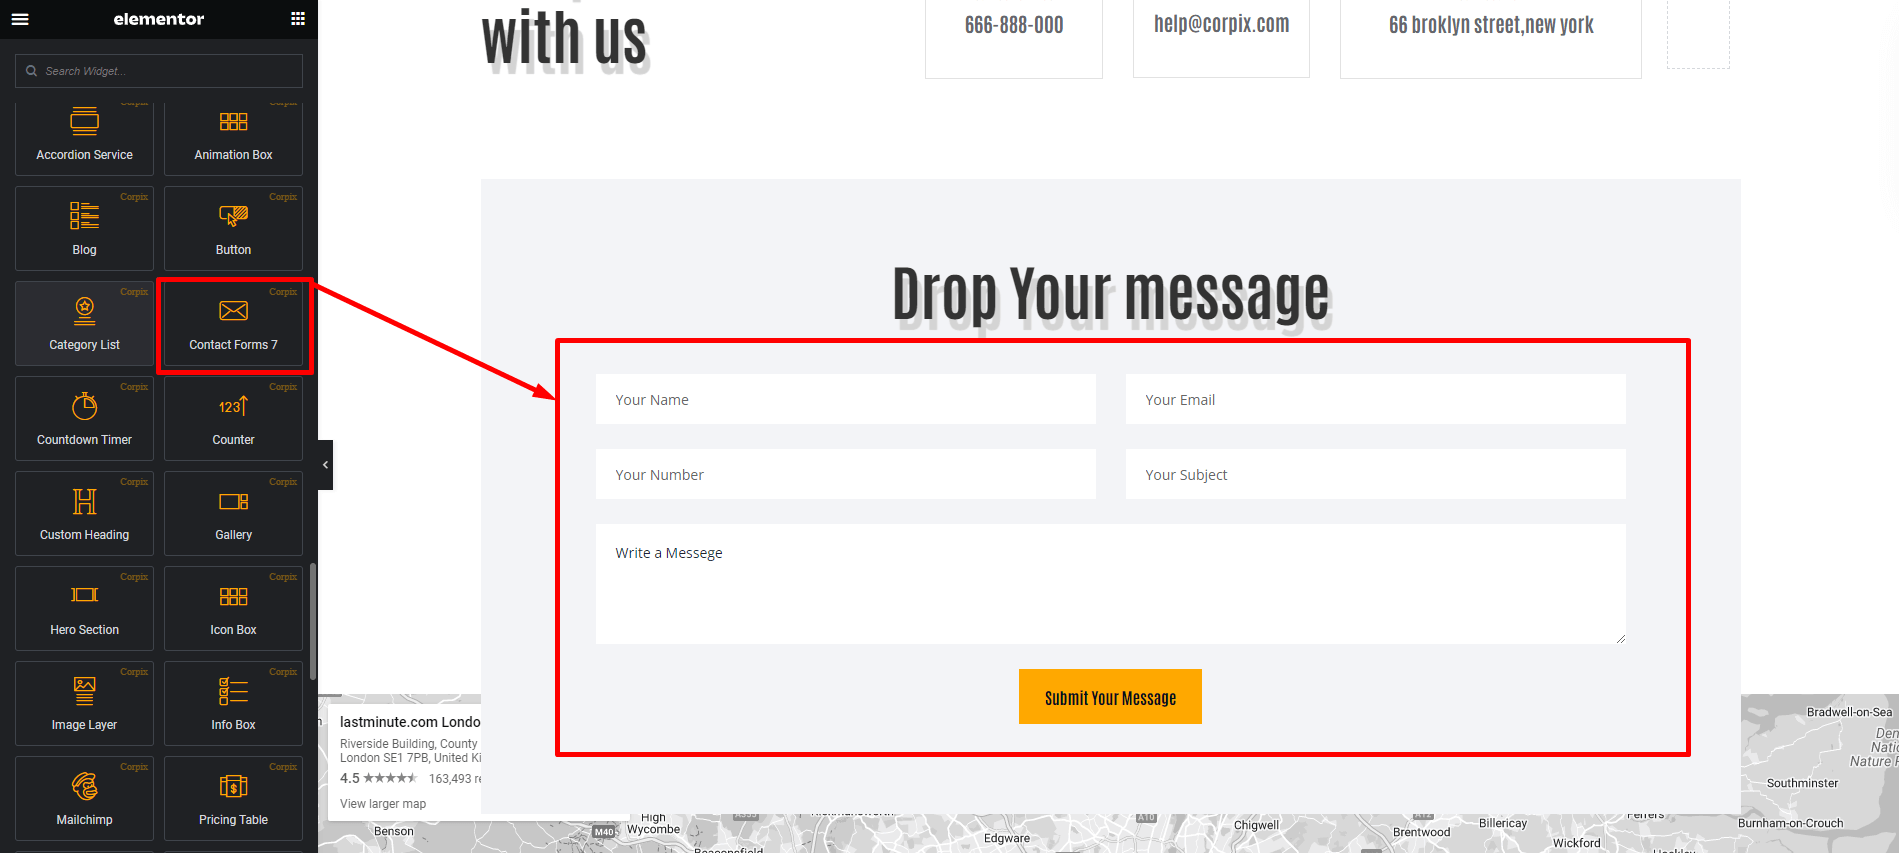
Contact Forms 7
To design contact form easily we've created this element. Follow the screenshot below.
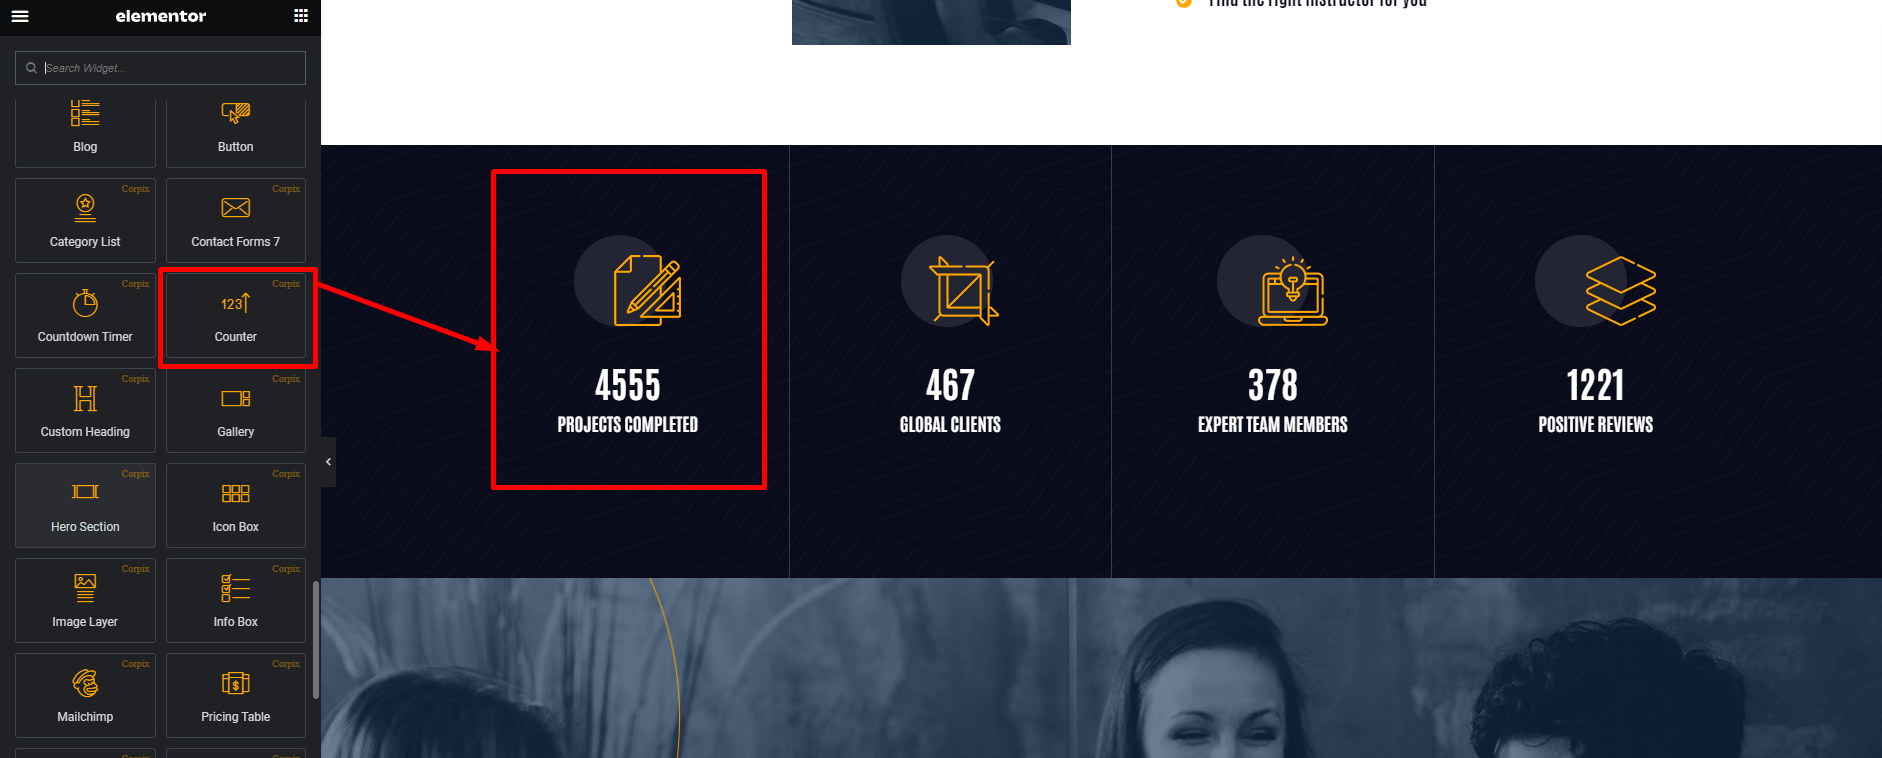
Counter
Using this element you can build counter like in the following screenshot below.
Custom Heading
Using this element you can create custom pre styled heading like in the following screenshot.

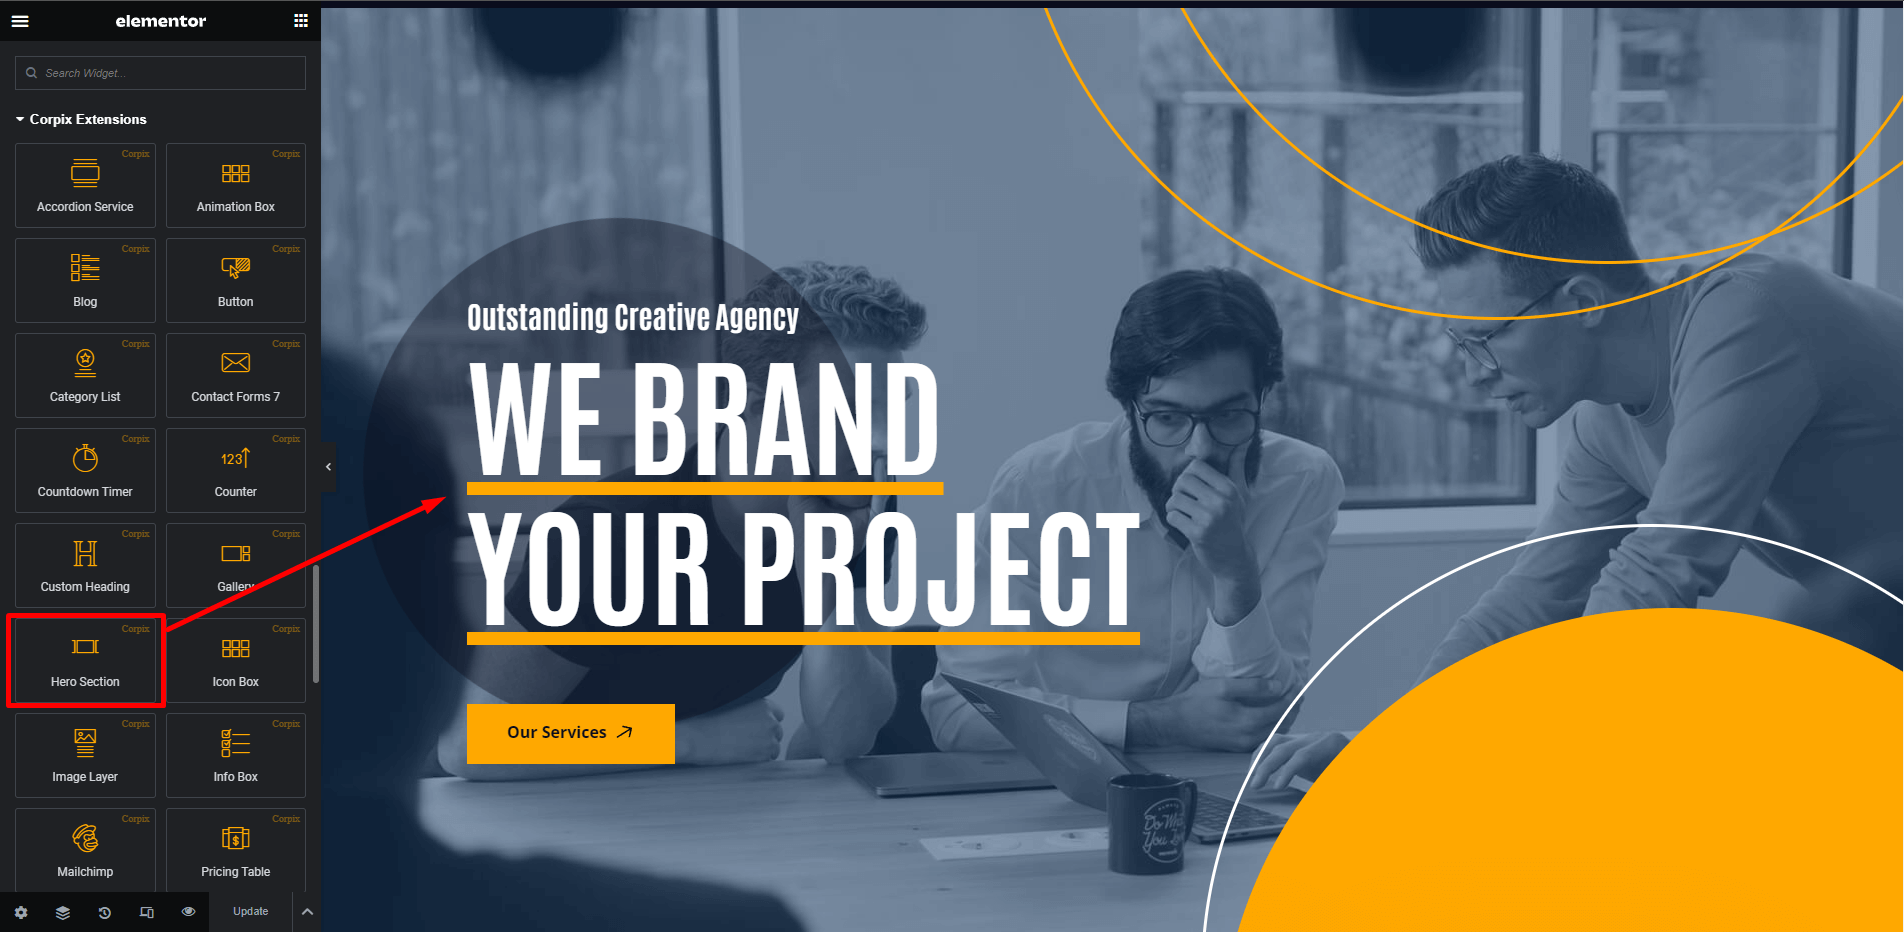
Hero 1
Using this element you can easily create pre styled hero. This is hero element 1. Follow the screenshot.
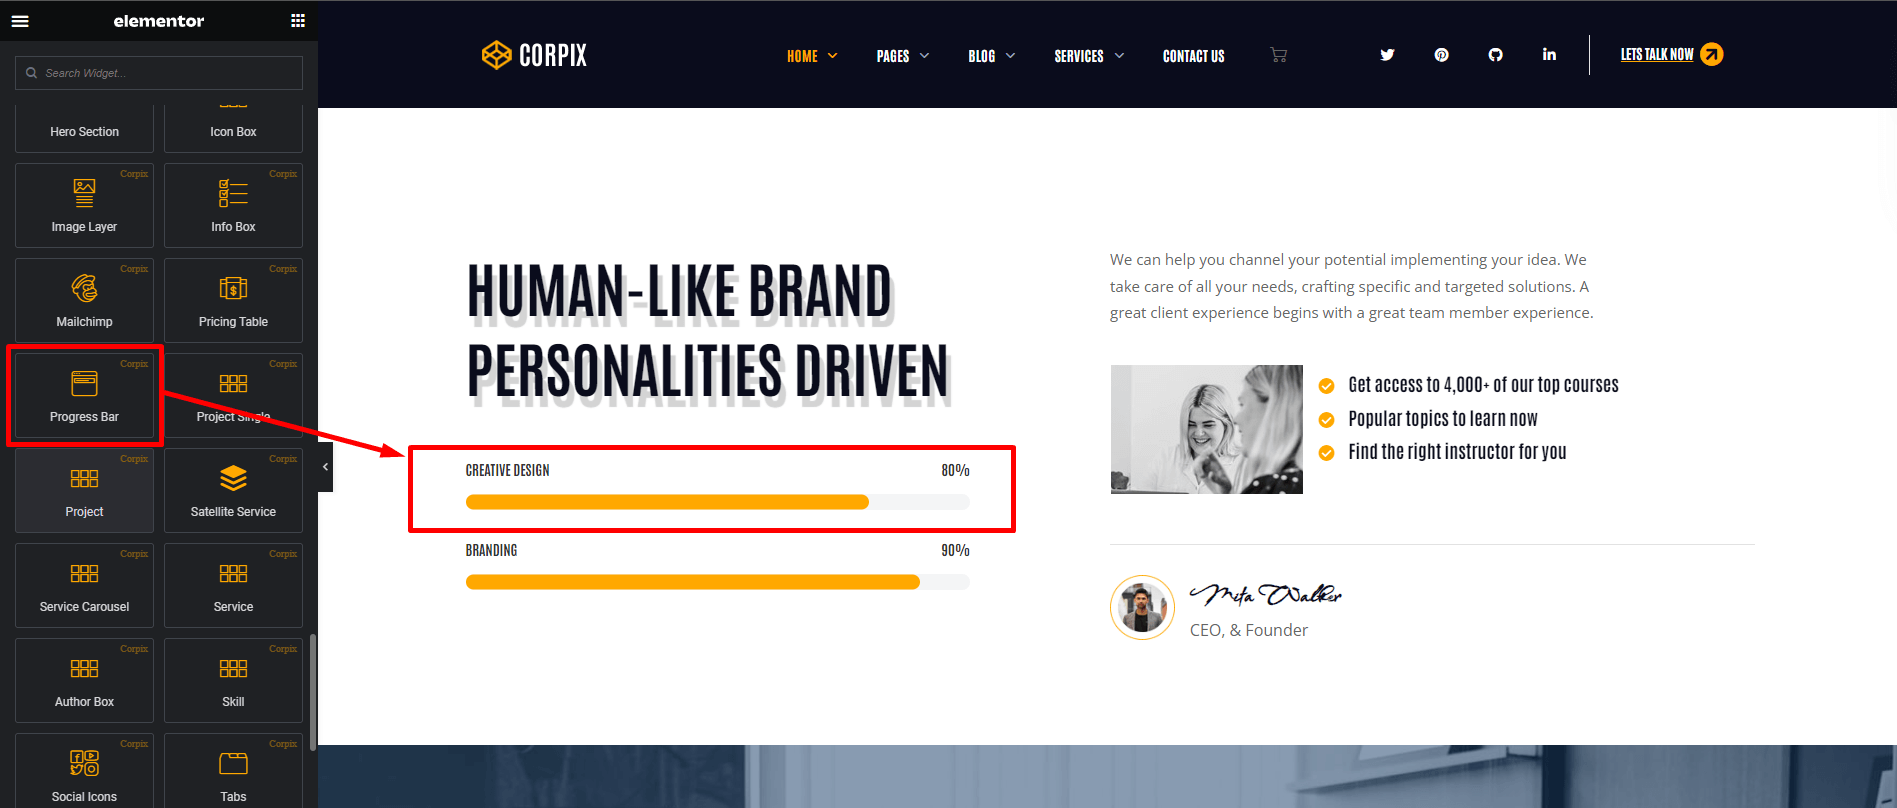
Progress Bar
You can create awesome progress bar. Follow the screenshot.
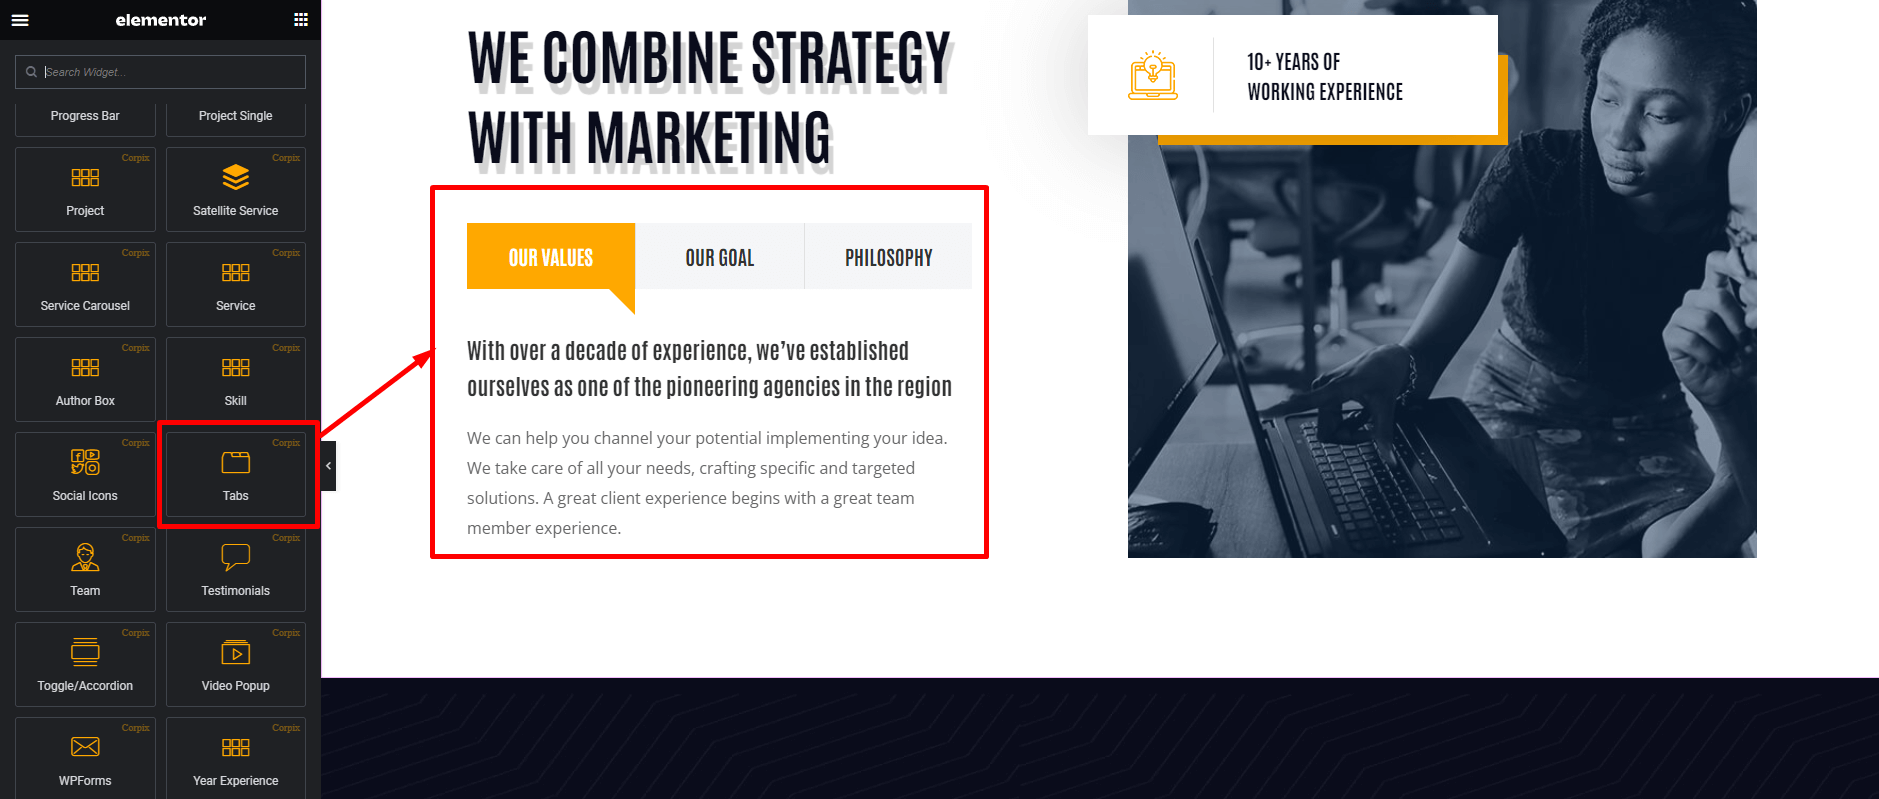
Tabs
Using this element you can create tab section like in the following screenshot.
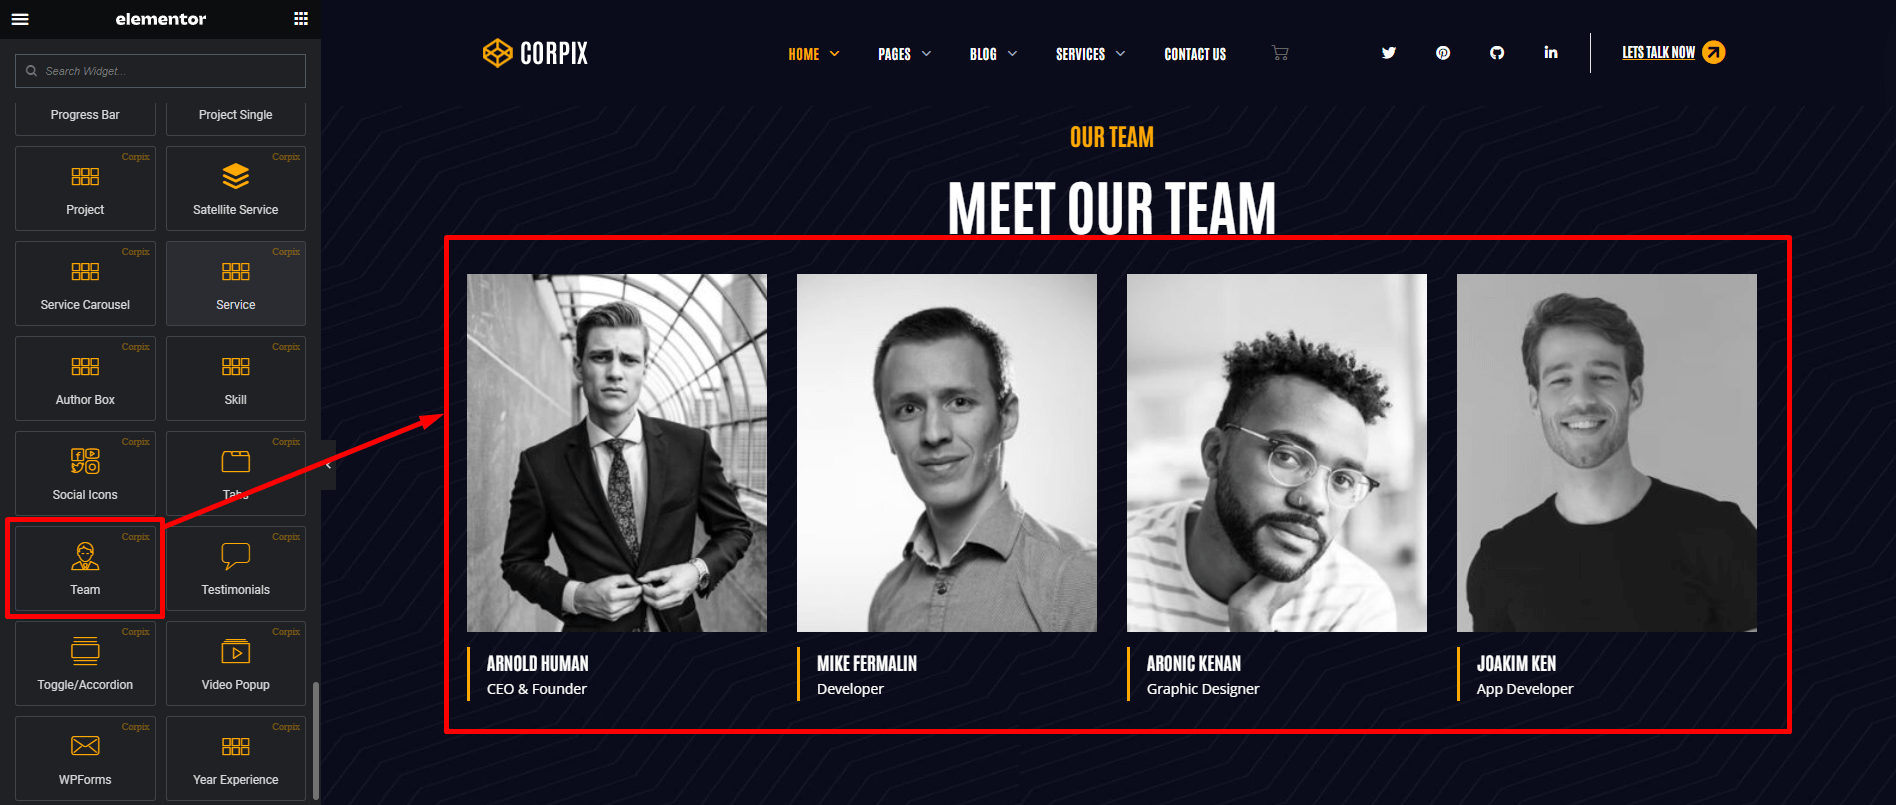
Team
Using this element you can create pre styled team element like in the following screenshot.
Testimonial
Using this element you can create testimonial like this. Follow the screenshot. You will find 7 different styles in testimonial element

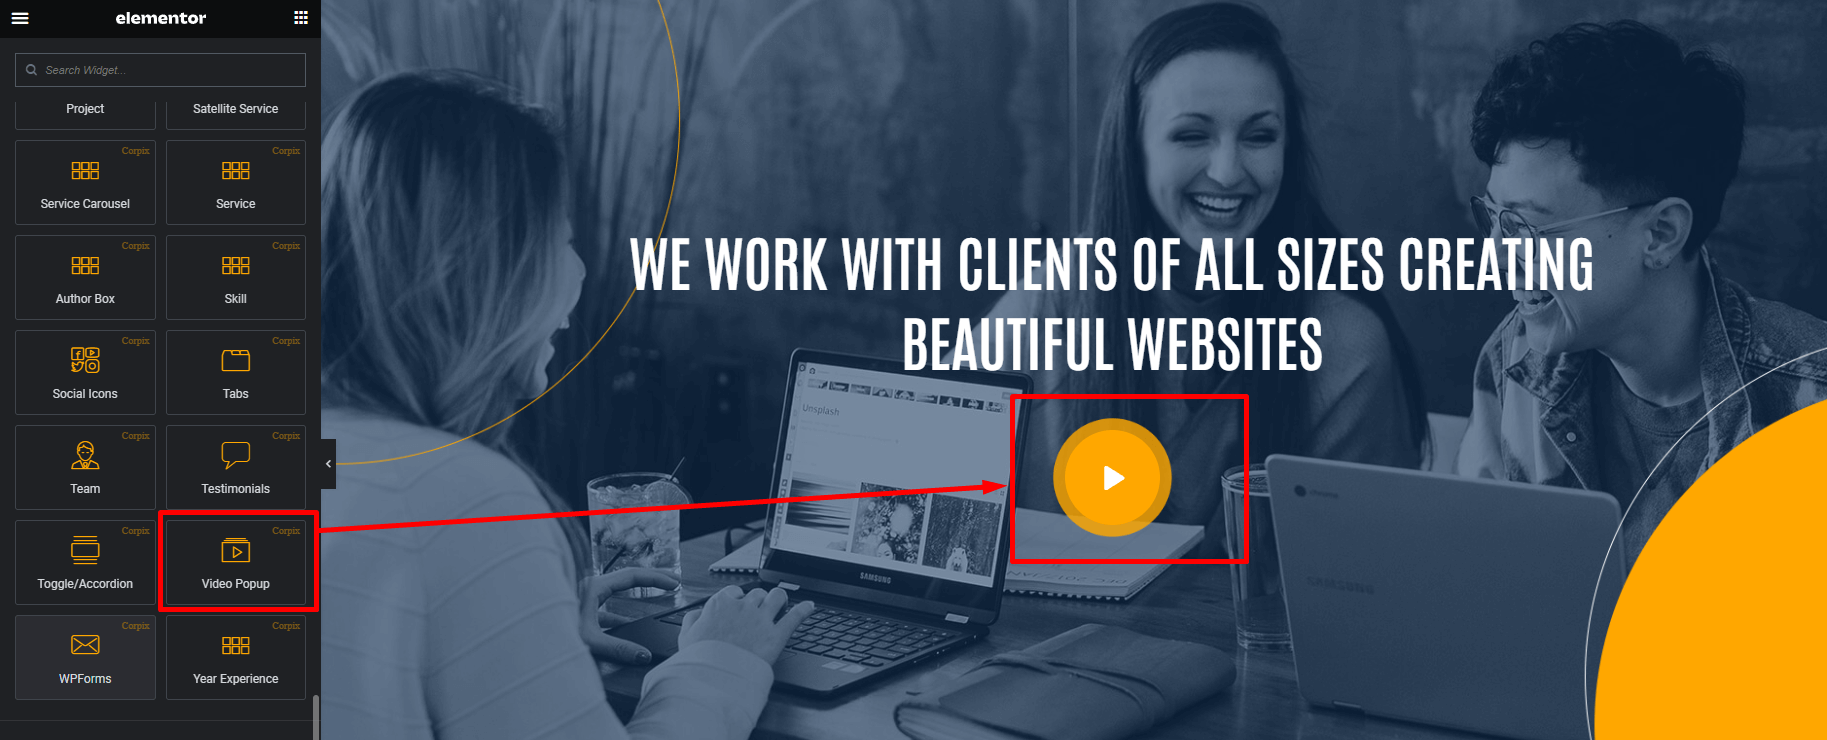
Video Popup
You can create video Popup button using this element. Follow the screenshot below.
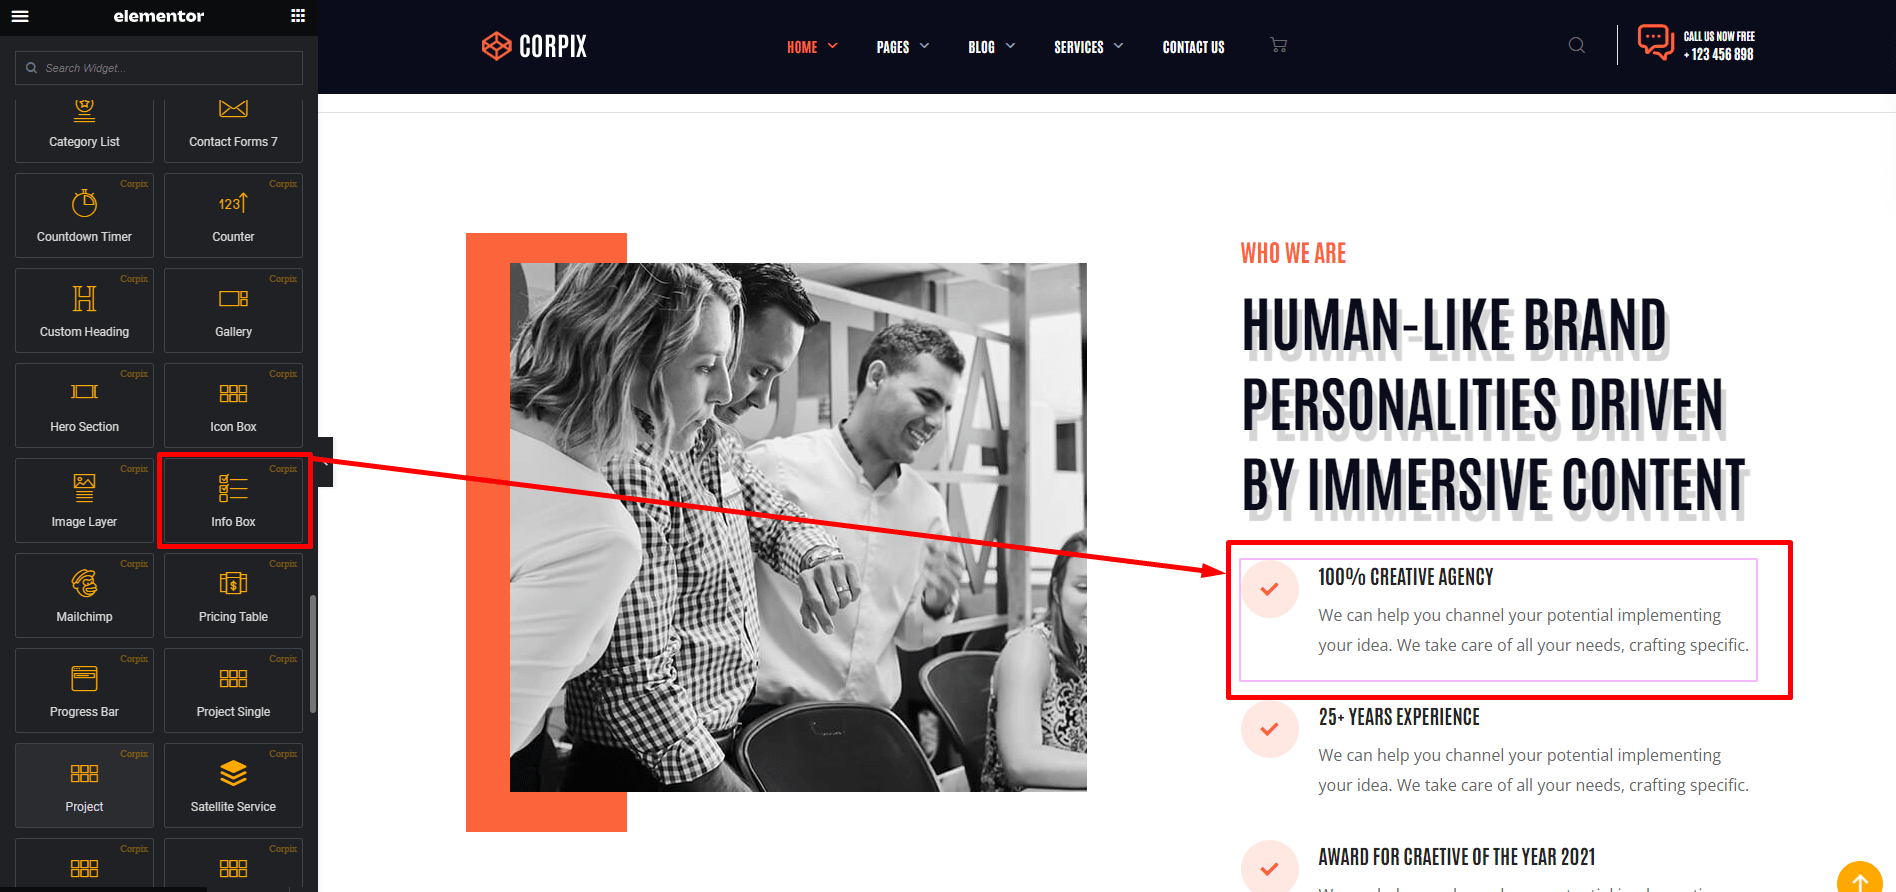
Info Box
Using this element you will able to create info box like in the following screenshots.
Social Icons
This element will create social icons like in the following screenshot below.
![]()
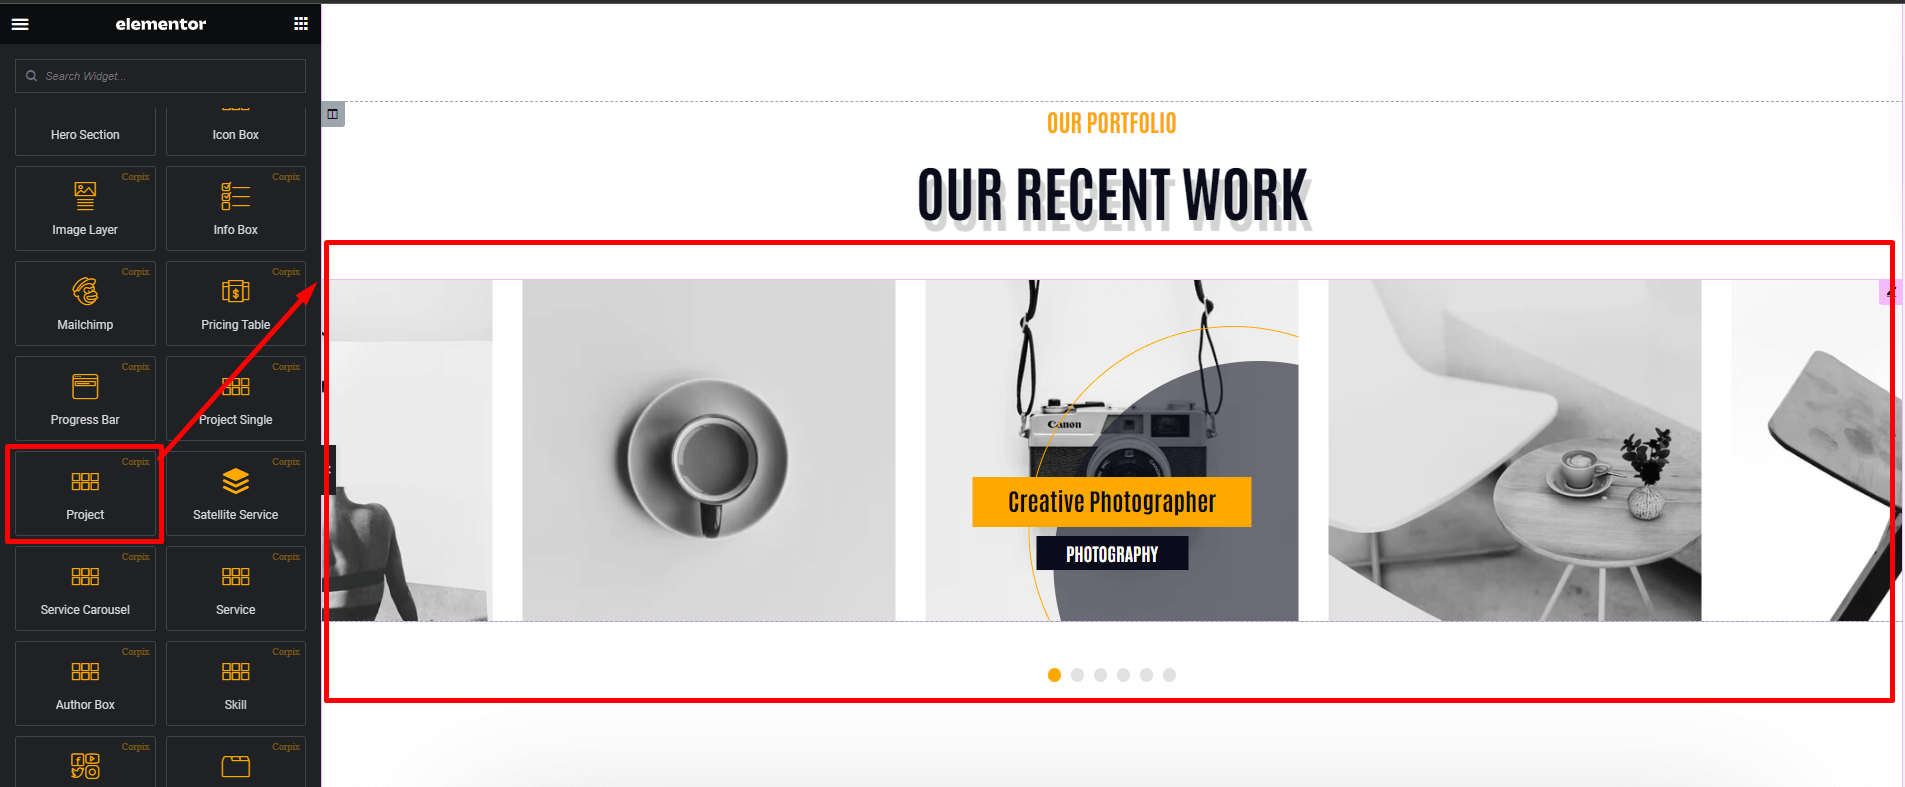
Project
This element will create project carousel like in the following screenshot below.
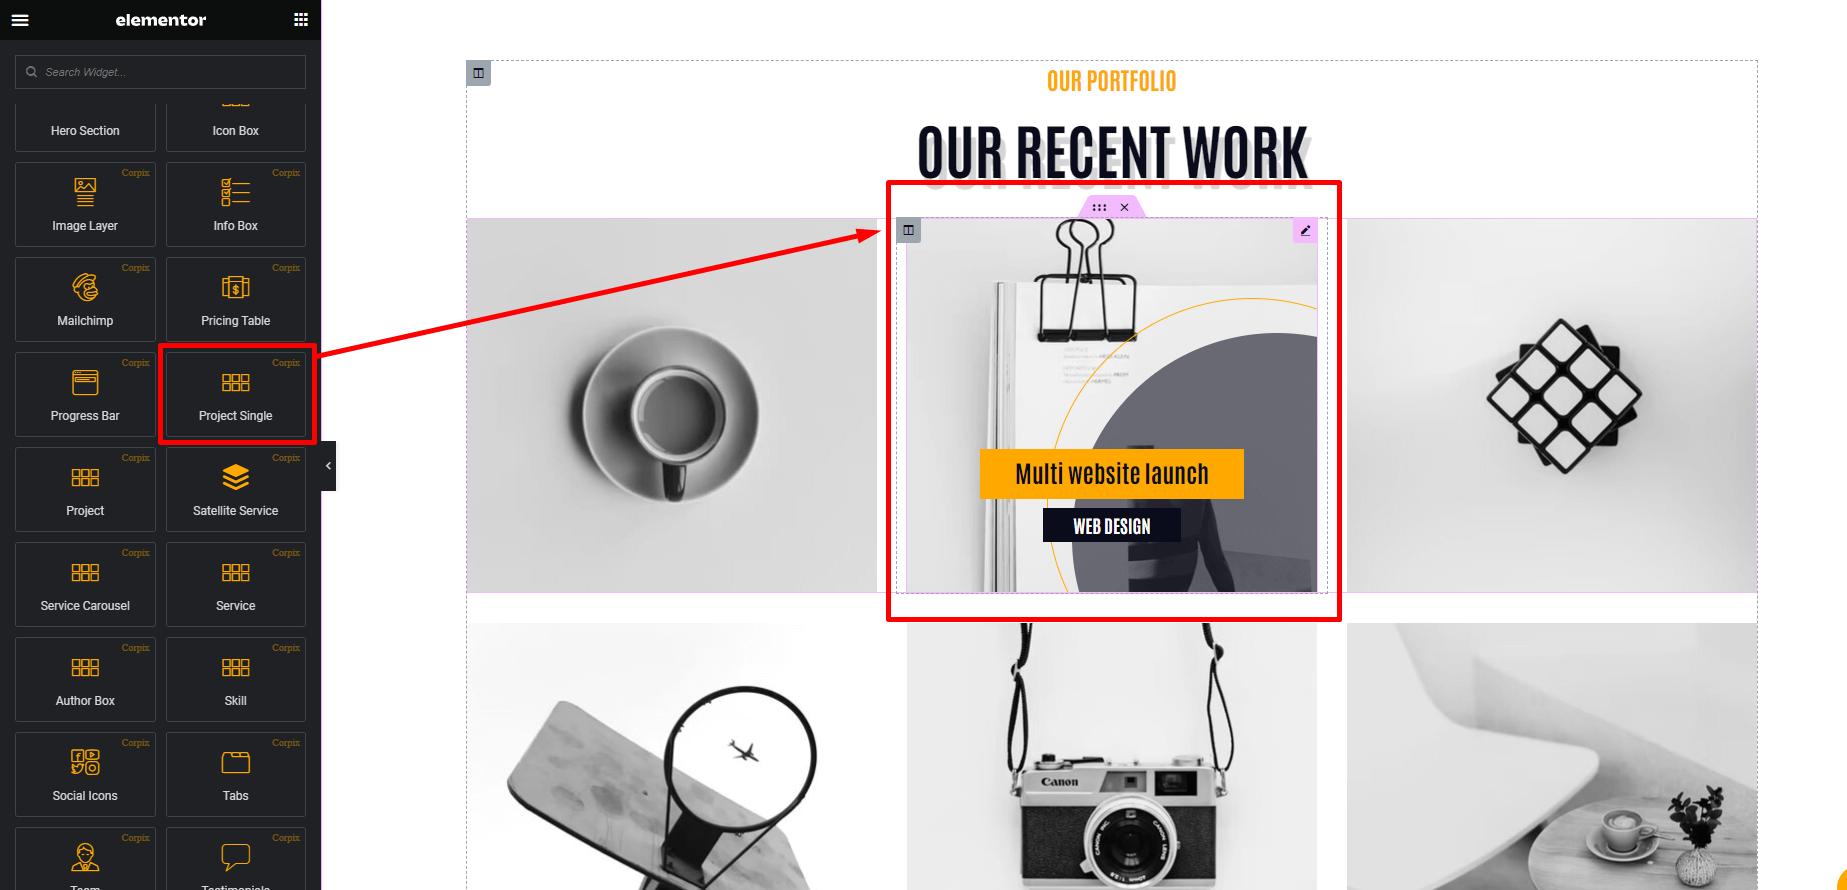
Project Single
This element will create single project item like in the following screenshot below.
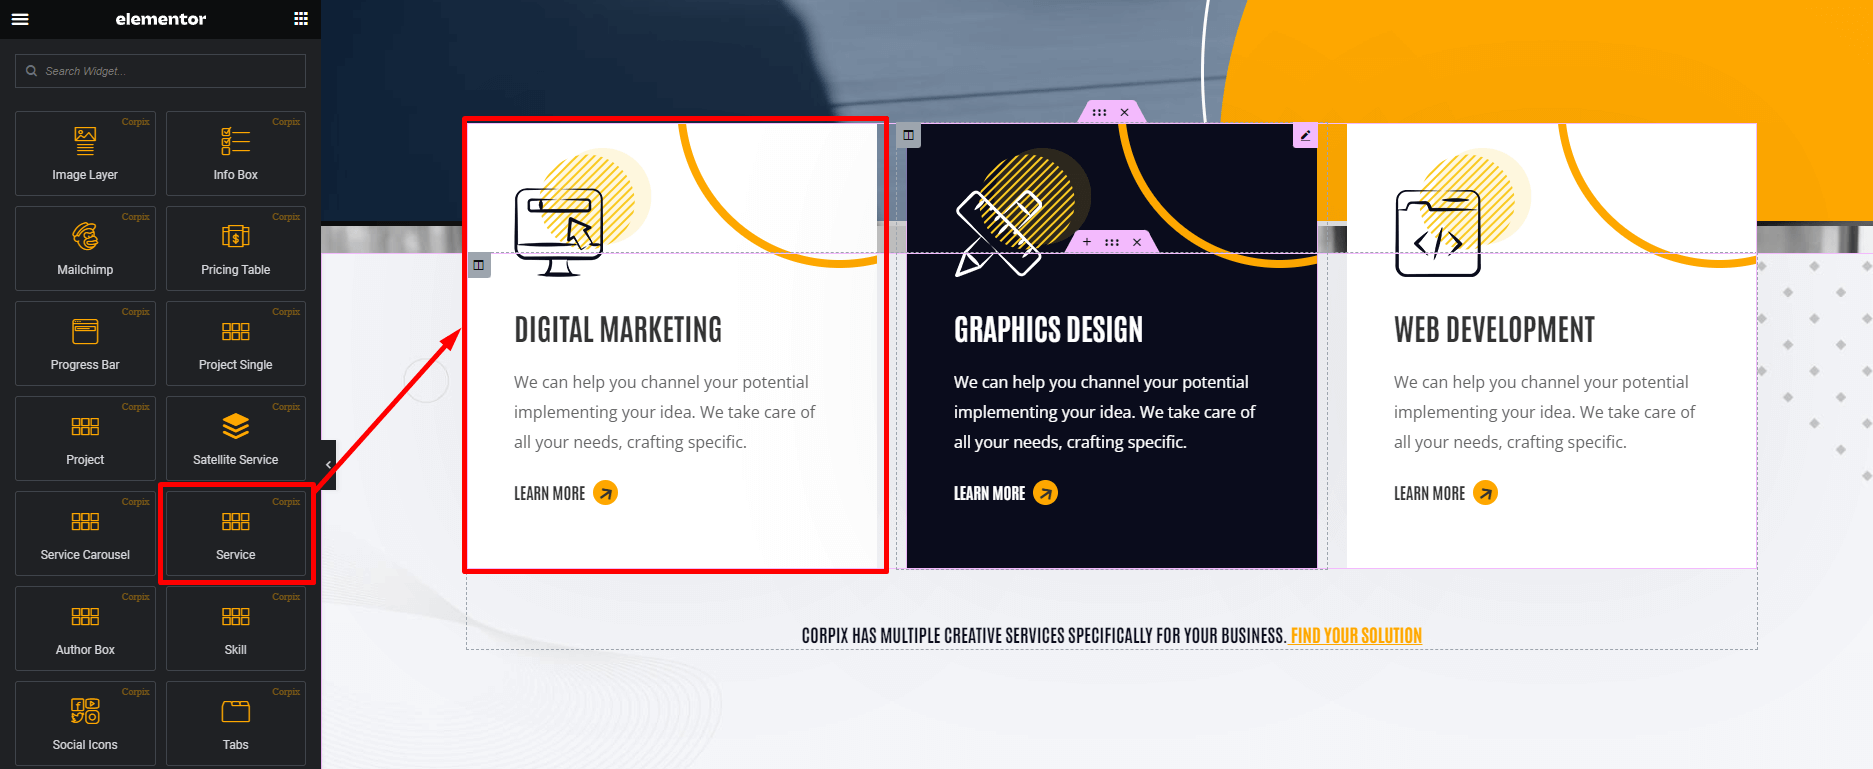
Service
This element will create service item like in the following screenshot below. Service element have 6 different styles.
WooCommerce Shop
WooCommerce is the world's most popular open-source eCommerce solution. The theme is fully compatible with WooCommerce. To know how to buy or sell your products using our theme follow the video Playlist
Child Theme
A child theme allows you to change small aspects of your site’s appearance yet still preserve your theme’s look and functionality. To understand how child themes work it is first important to understand the relationship between parent and child themes.
FAQs
Support
If you have any questions, ideas or suggestions, please create ticket through our support channel Support Desk
We usually respond within 24 hours of each ticket. But it can take up to 2 days.
Don’t forget to Rate this theme
Go to your Themeforest Profile > Downloads Tab > & then You can Rate & Review for our theme.
Thank You.
Changelog
See what's new added, changed, fixed, improved or updated in the latest versions.
For Future Updates Follow Us @themeforest
= 1.1.5 - July-28-2024 =
Updated: Blog date show option if not has feature image
= 1.1.4 - July-04-2024 =
Added: Hero addon shape show/hide option
Updated: Service addon hover effect
= 1.1.3 - May-01-2024 =
Fix: Hero addon style 3 sub title change issue
= 1.1.1 - Mar-15-2024 =
Fix: Hero addon style 3 background color change issue
= 1.1.0 - Mar-10-2024 =
Fix: Team widget social icon double showing isue
= 1.0.9 - Mar-07-2024 =
Fix: Service addon color change option
Updated: WooCommerce old template files
= 1.0.8 - Feb-13-2024 =
Fix: Team widget hover color change issue
= 1.0.7 - Feb-10-2024 =
Fix: incompatible archive issue
= 1.0.6 - Feb-09-2024 =
Fix: Core plugin update issue
= 1.0.5 - Feb-03-2024 =
Fix: Custom addon settings issue
= 1.0.5 - Jan-25-2024 =
Updated: Minor CSS style
= 1.0.3 - Dec-10-2023 =
Added: Corpix child theme
= 1.0.2 - Nov-10-2023 =
Fix: License activation issue
= 1.0.1 - Nov-07-2023 =
Updated: One click dummy data import feature
= 1.0.0 - Nov-07-2023 =
Initial Release